Getting started with the DroiX PM14 4K portable monitor
Congratulations on your new DroiX PM14 4K portable monitor! This getting started with the DroiX PM14 4K portable monitor guide has been created to help you get started, showcasing not only how to use the monitor but also highlighting various features and connectivity options that you might not yet be familiar with. Additionally, we’ve included some helpful tips and troubleshooting steps in case you encounter any issues.
For any questions or issues with your portable monitor
At GPD Store, we take great pride in offering exceptional customer service both before and after your purchase. If you have any questions or experience any issues with a product you’ve bought from us, please don’t hesitate to get in touch. We’re always here and happy to assist, ensuring your questions are answered and any issues are promptly resolved.
Checking the contents of the box
Before using your portable monitor, it’s important to check that all the necessary components are included.
DroiX PM14 Touch screen Model
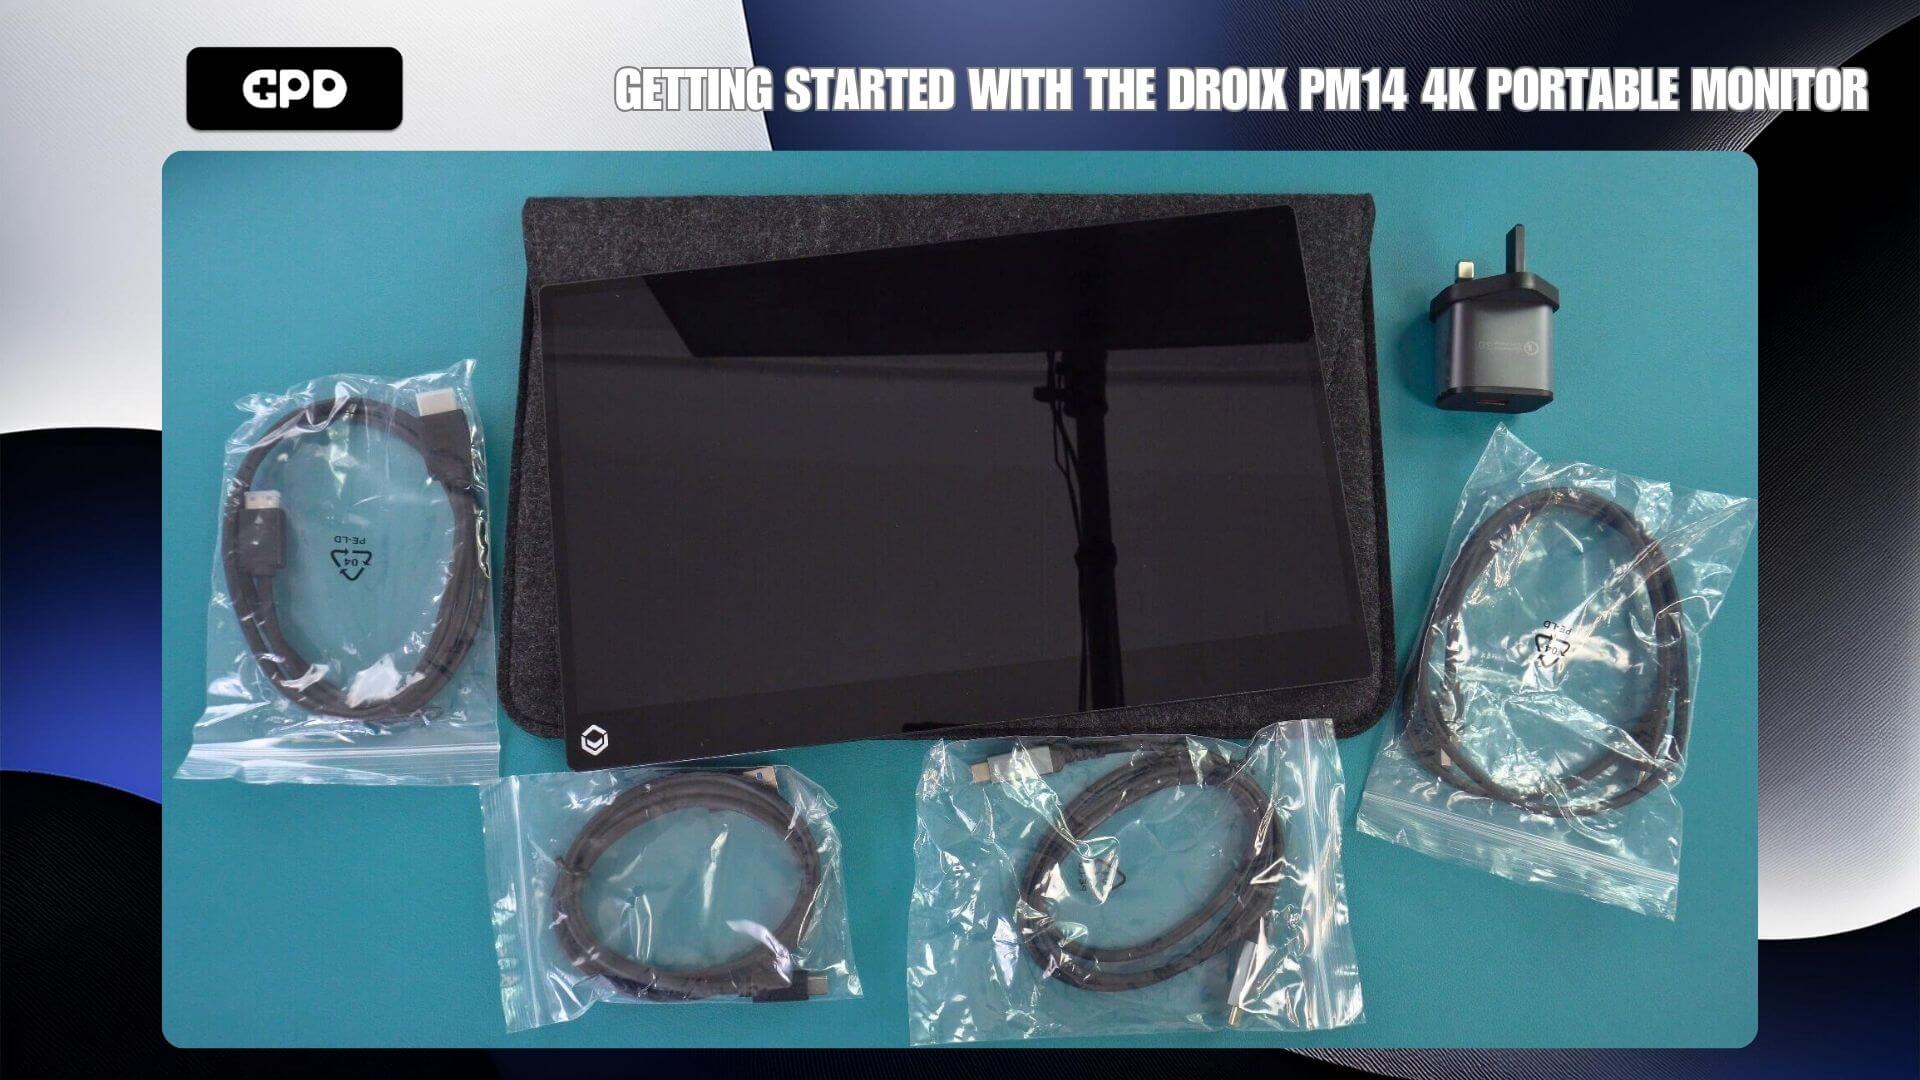
For the DroiX PM14 Touch screen Model: You should find an HDMI to Mini HDMI cable, a USB Type-C to Type-C cable, and a USB-A to Type-C power cable. For the touchscreen version, an additional USB-A to Type-C data cable is also provided.
DroiX PM14 Non-touch screen model

For the DroiX PM14 Non-touch screen Model: This model includes an HDMI to Mini HDMI cable, a USB Type-C to Type-C cable, and a USB-A to Type-C power cable.
Connecting your DroiX PM14 to a device
To get started right away, simply connect the supplied HDMI cable to both the DroiX PM14 and your device. Then, plug the supplied power adapter and USB cable into one of the monitor’s USB-C ports. Once your device and the monitor are powered on, you should be all set and ready to go.
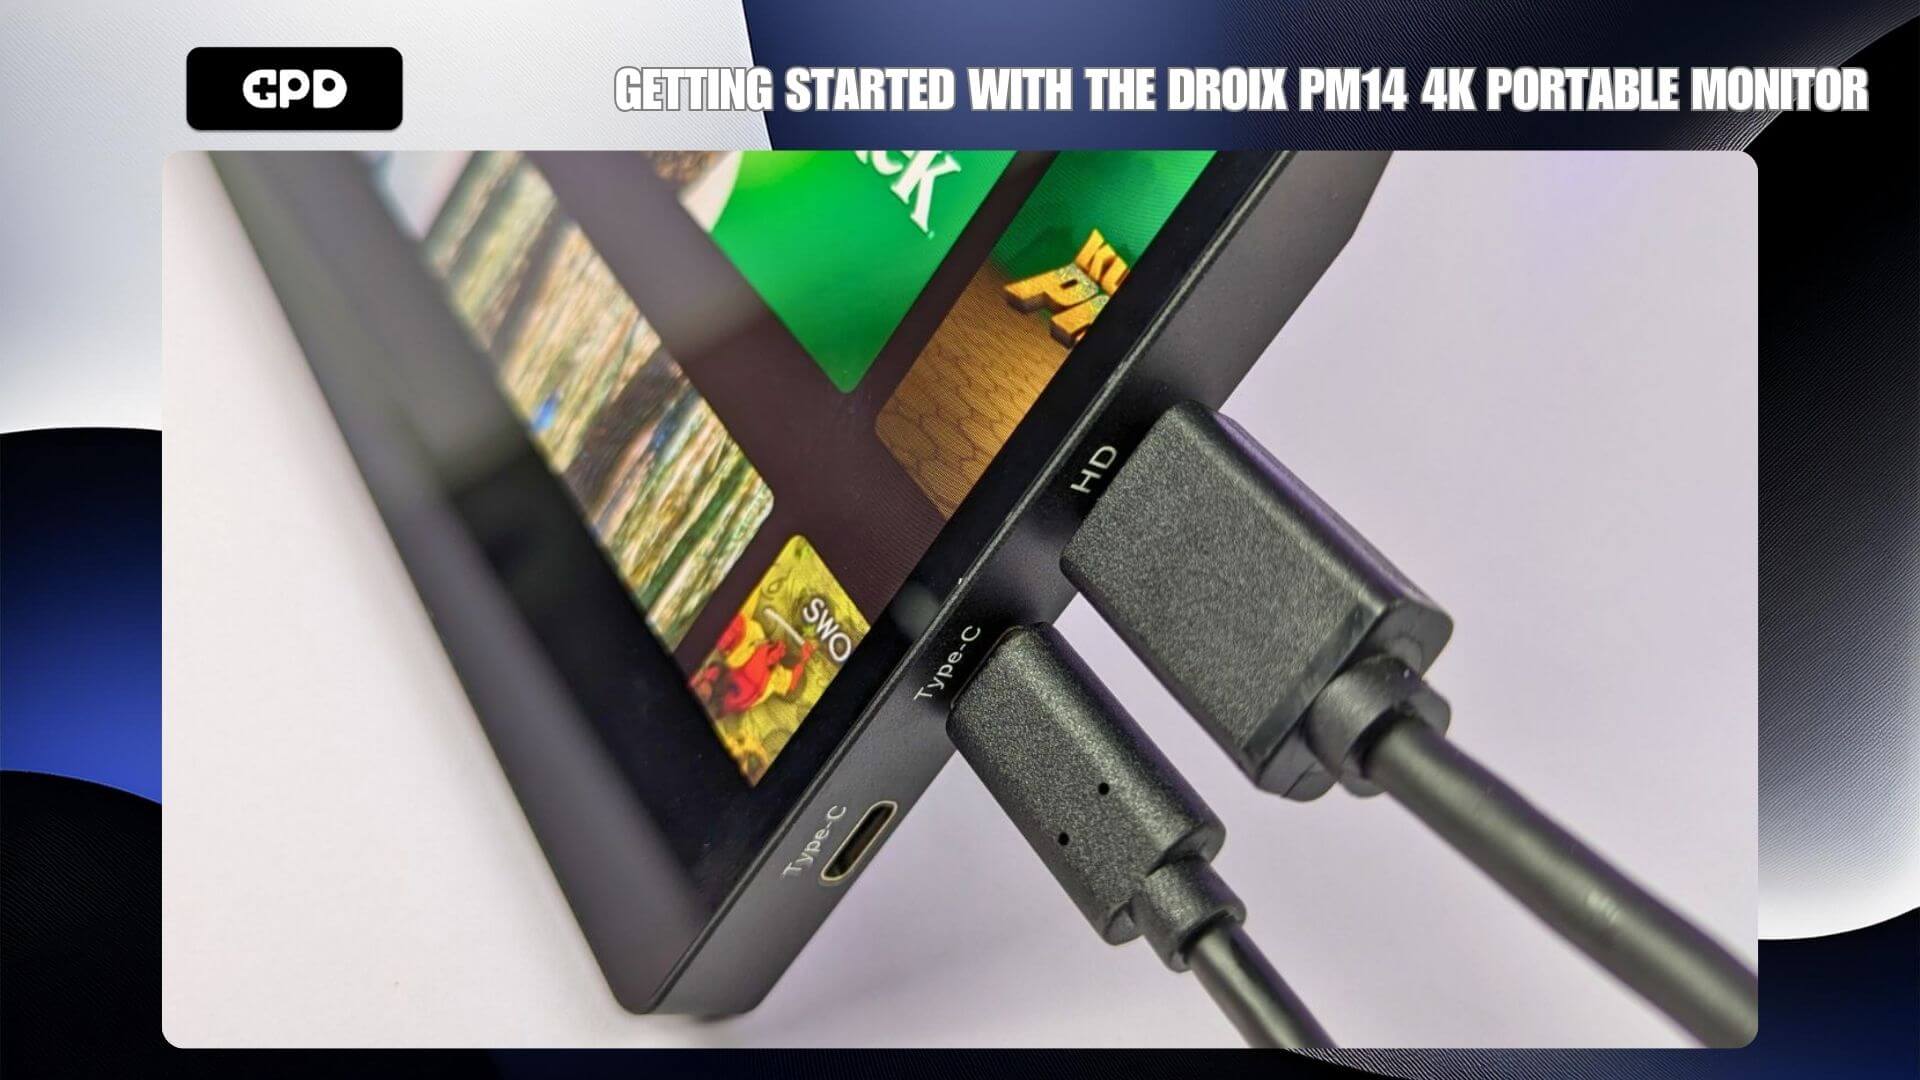
In addition to HDMI for video, you can also use the included USB-C to USB-C cable with compatible devices such as a mini laptop or GPD handheld gaming PC. In many cases, this will provide power, video, and data to the monitor. However, some devices may not supply enough power, resulting in the monitor either not powering on or experiencing intermittent issues. For best results, we recommend using the supplied power adapter whenever possible.
The below video guide to show you the best ways to connect your DroiX PM14 portable monitor to your device.
| Mini PCs | HDMI & charger HDMI & USB-A to USB-C (for power) USB-C (for video and power) |
| Laptops | HDMI & charger HDMI & USB-A to USB-C (for power) USB-C (for video and power) |
| MacBook | HDMI & charger USB-C |
| Chromebook | HDMI & charger USB-C |
| Samsung DEX | USB-C & charger recommended |
| iPad (Lightning Port) | HDMI with Lightning to HDMI converter (not included) & charger |
| iPad (USB-C Port) | USB-C & charger |
| iPhone (Lightning Port) | HDMI with Lightning to HDMI converter (not included) & charger |
| iPhone (USB-C Port) | USB-C & charger |
| Gaming Handheld | HDMI & charger USB-C & charger recommended |
Navigating the DroiX PM14 menu
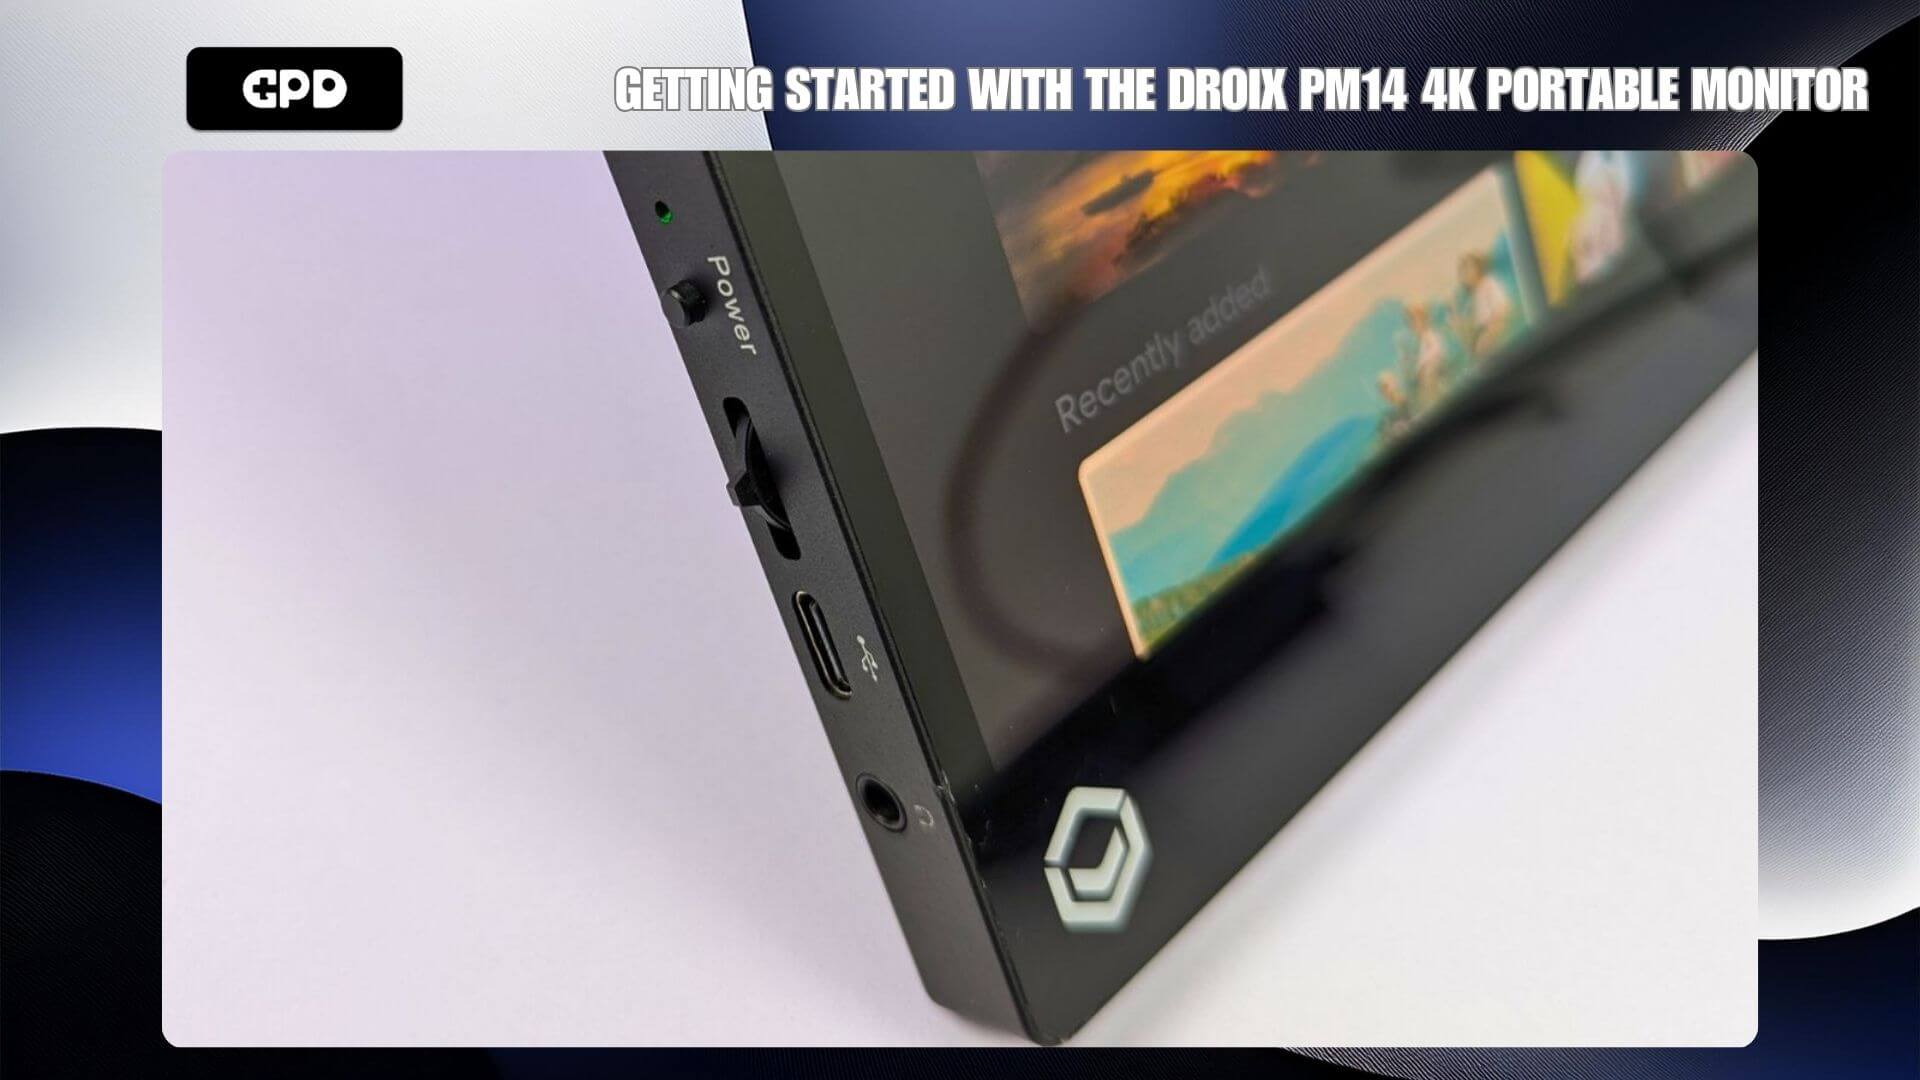
To access the portable monitor’s menu, press the jog dial. Use the dial to scroll through the options by pushing it Up or Down, press the dial to select an option, and press the Power button to go back one level in the menu.
The menu offers a range of options, including adjustments for picture, color, and audio settings, as well as language, HDR, and input source selections.
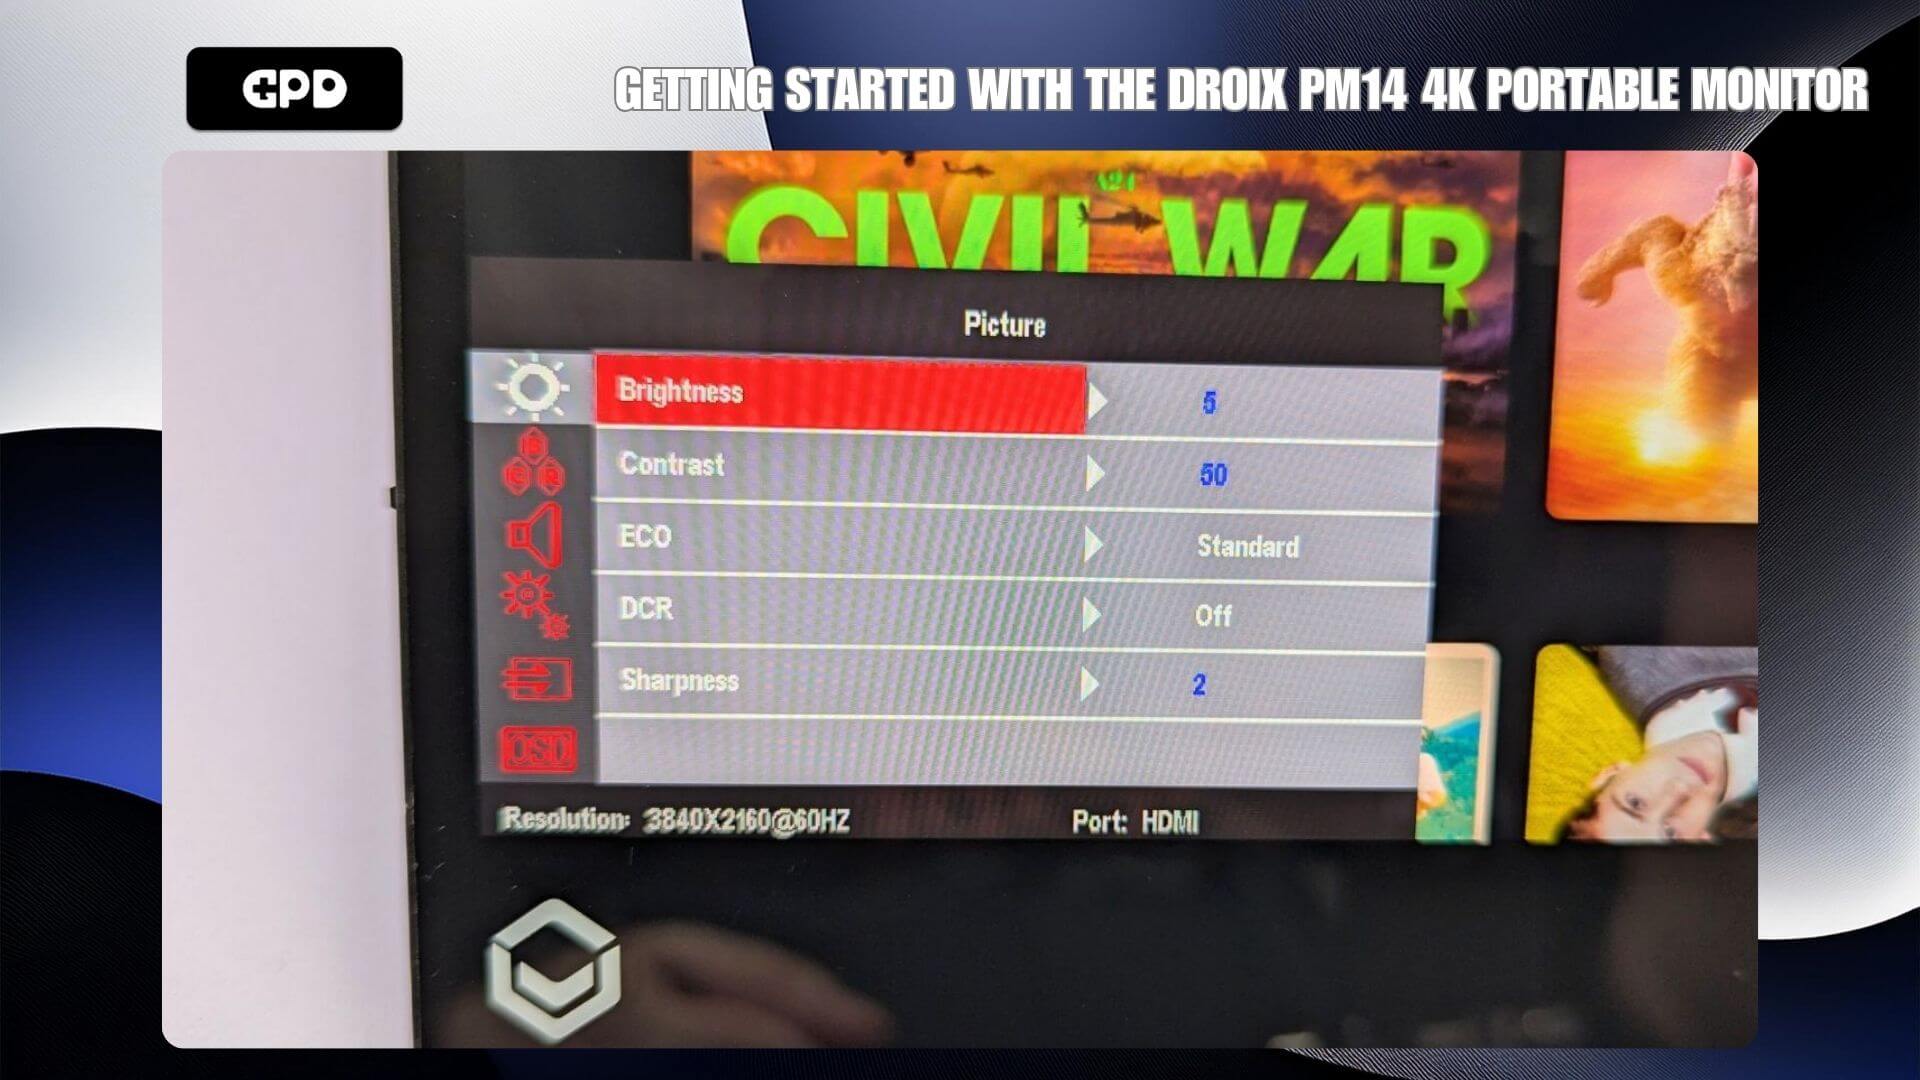
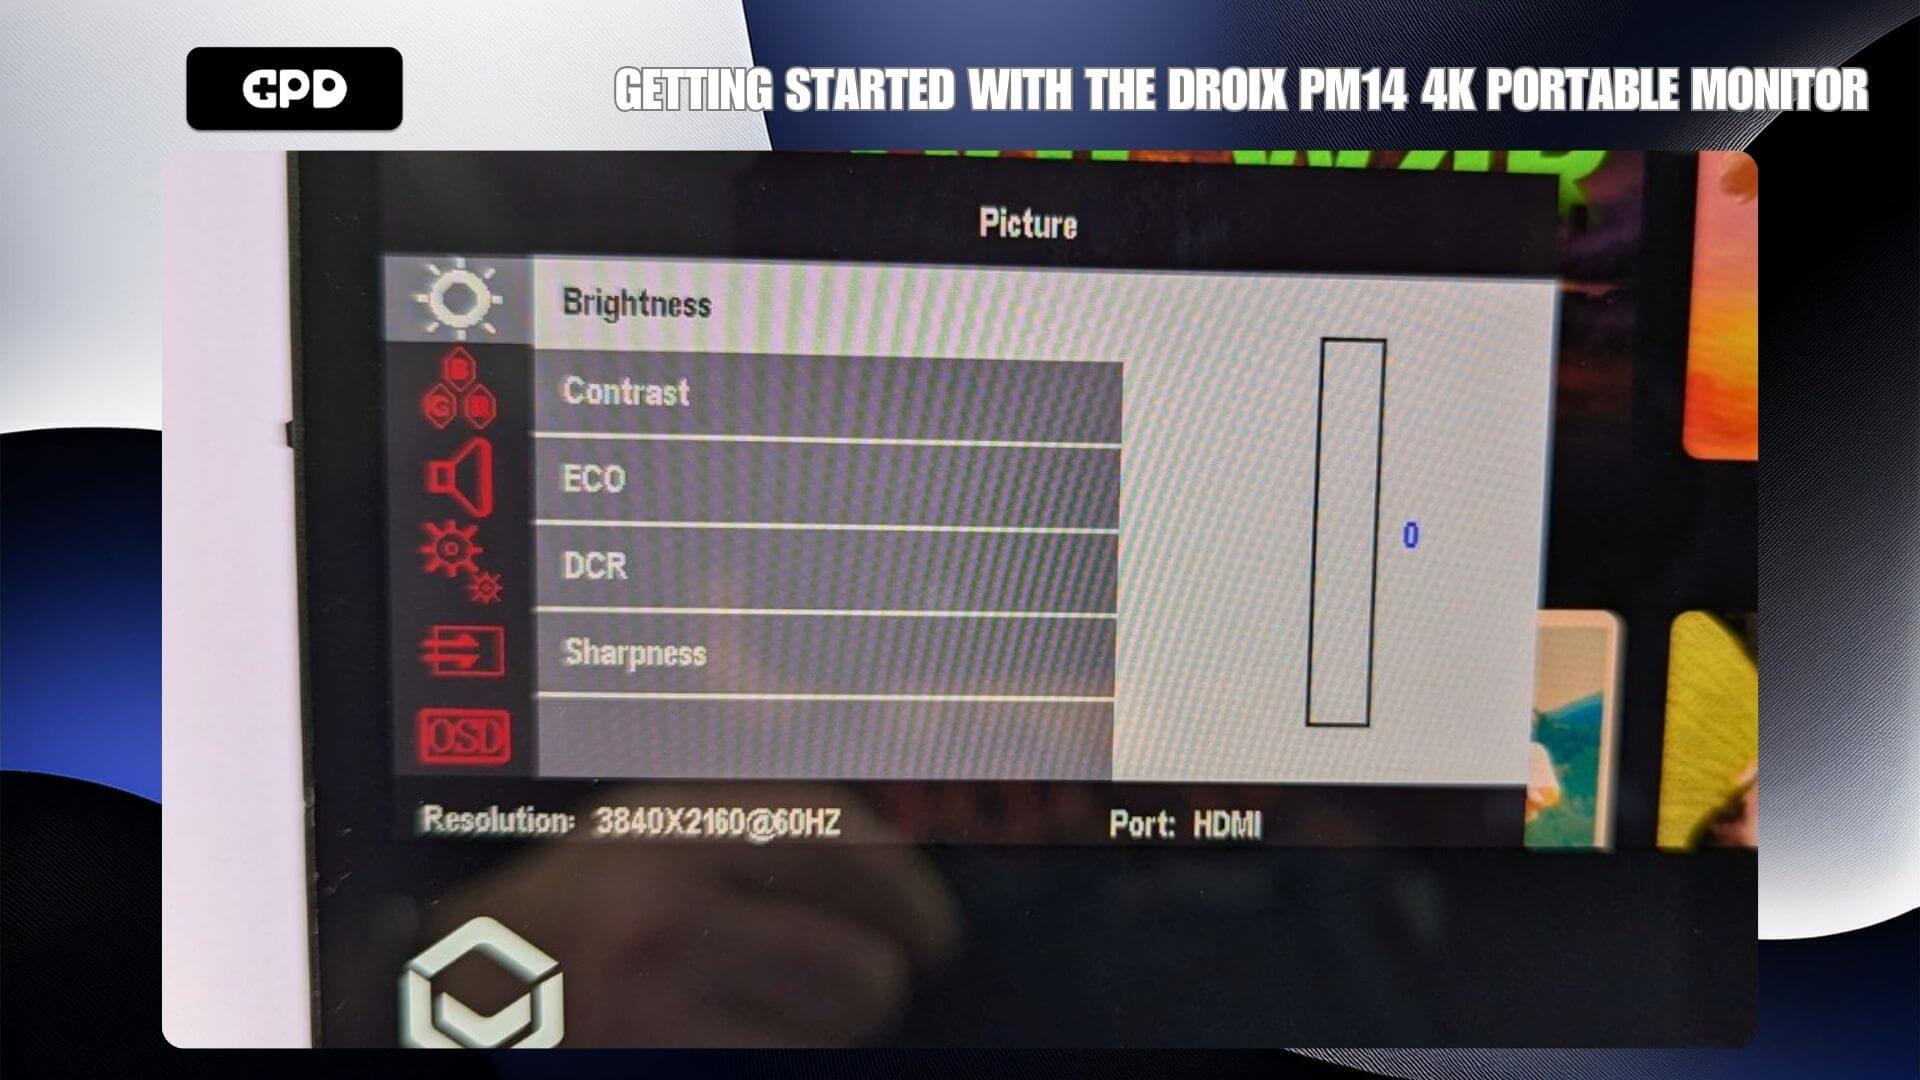
Once you’re satisfied with the settings, press the Power button to back out through the menu options, and press it again to close the menu entirely.
Windows Display Settings
A common question we receive is about the display appearing lower quality than expected. This is usually due to the wrong screen resolution being set. The DroiX PM14 portable monitor supports up to 4K resolution, so using a lower resolution like 720P may not look as sharp.
To adjust the display resolution, type “Display Settings” into the Windows search bar and select it from the results.
If the display settings show “Duplicate these displays,” we recommend changing this to “Extend the displays” (to have your desktop spread across two monitors) or “Show only on the portable monitor” (typically labeled as display 2) to achieve the best resolution.
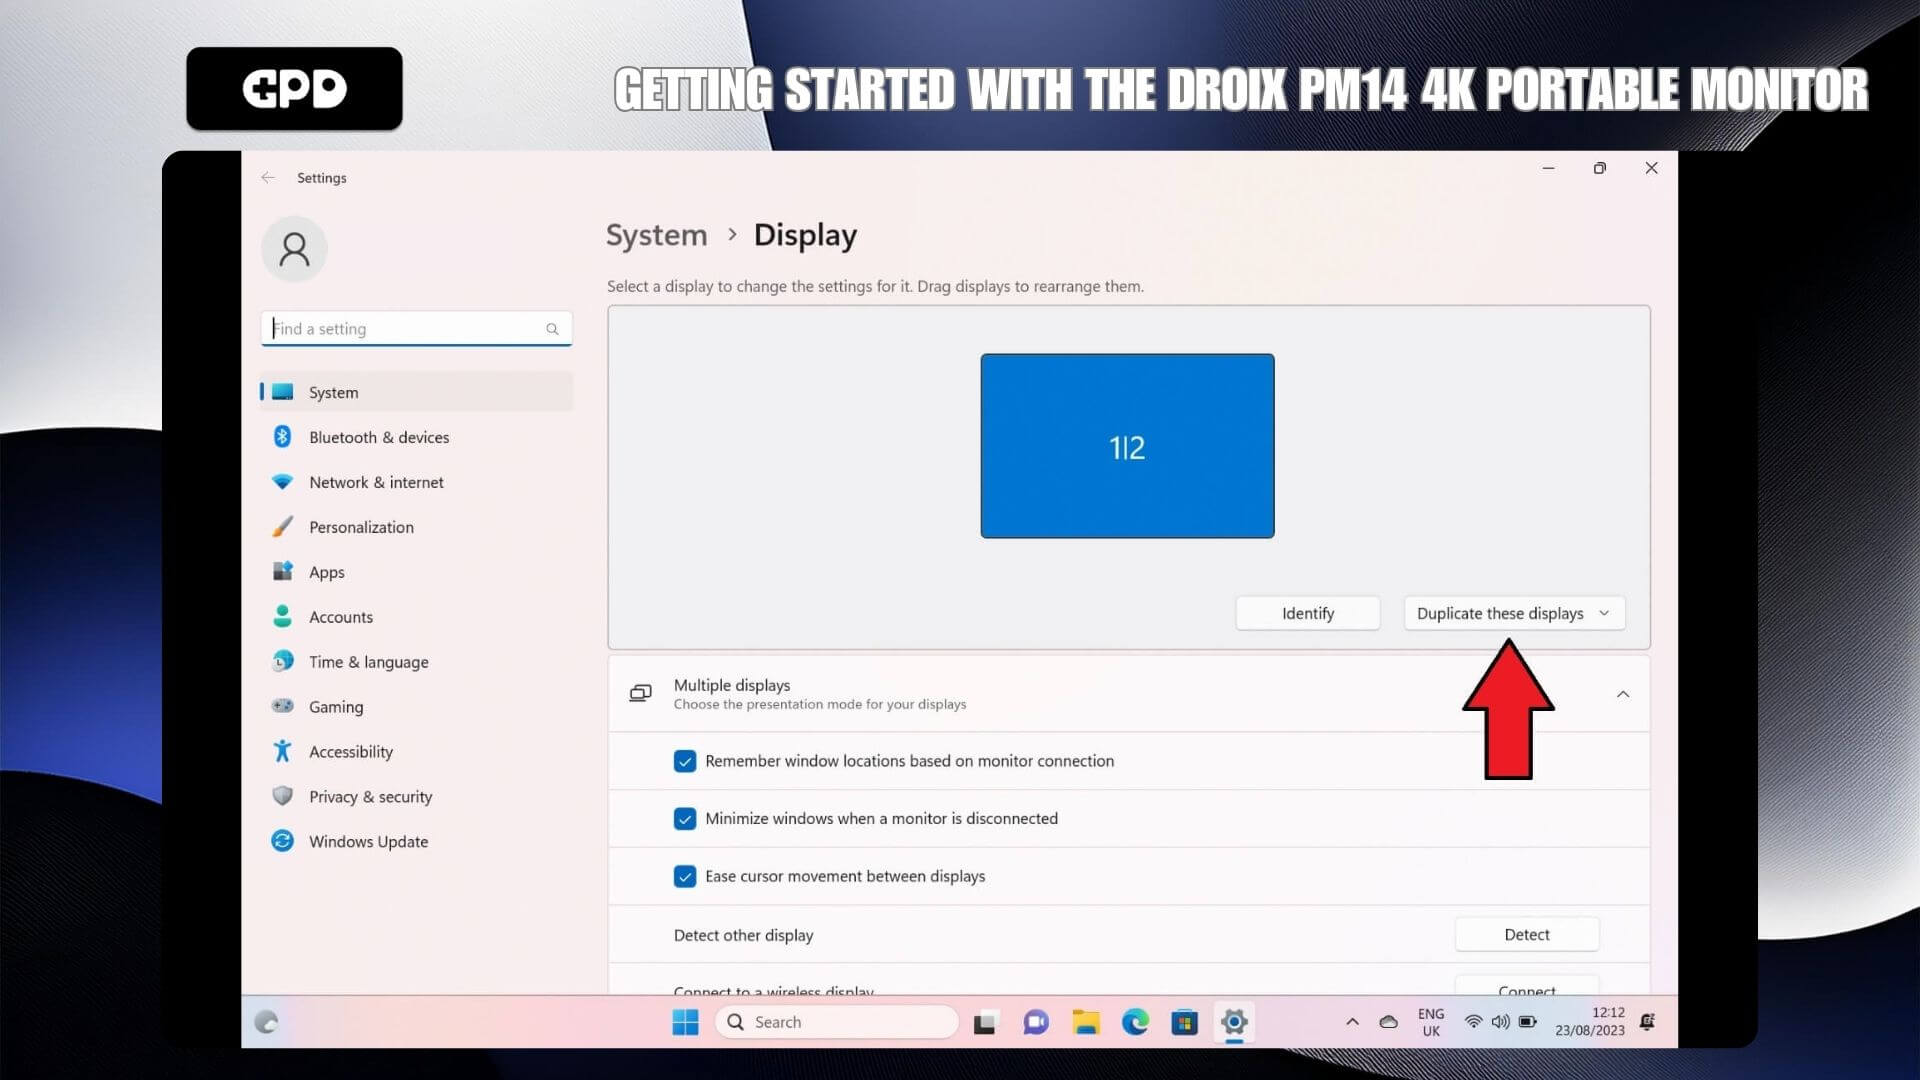
After selecting your preferred display setting, the monitor may briefly show a black screen while the resolution adjusts. It will then display either your usual desktop if using only the portable monitor or an empty desktop if extending the displays.
Since the DroiX PM14 is a 4K monitor, you can now adjust the screen resolution to the highest level your device supports.

If you encounter display issues, we recommend checking the refresh rate to ensure it is set correctly, either at 30 or 60Hz. You can adjust this by selecting the “Advanced Display” settings and choosing a refresh rate, such as 60.00 Hz.
Display Troubleshooting
Monitor flashing or not turning on
If your monitor is flashing black or staying in standby mode, the most common issue is insufficient power being supplied to the monitor. Ensure the monitor is receiving enough power, either from the charger or from the device if it’s being used to power it. If the problem continues, we recommend reaching out to GPD Store Customer Support for fast and efficient help.
When connecting the monitor to a phone, make sure that the portable monitor is plugged into the provided power adapter.
Screen Brightness
The display’s initial brightness is set to 30%. You can increase the brightness by adjusting the settings in the menu.
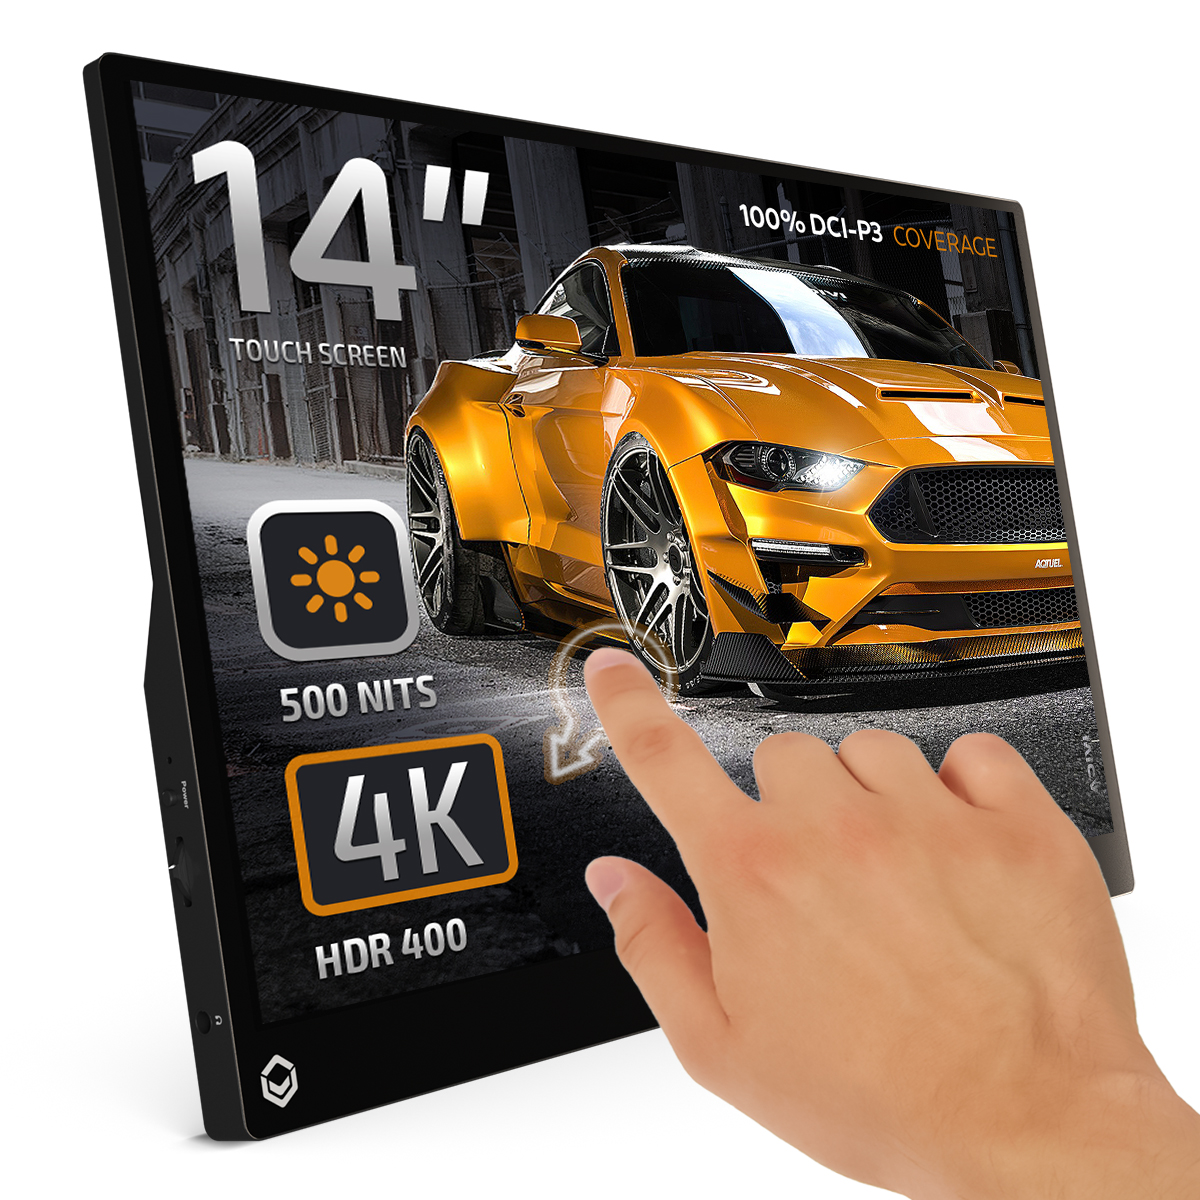
DROIX PM14 4K Portable Monitor
- 4K 14″ HDR400 Display
- 100% DCI-P3 Coverage
- 500 Nits Brightness
- Kickstand Built-In
- Built-In Speakers
Flexible & secure payment options
We use the latest technology in Payment Processing, which allows you to checkout via your Debit/Credit Card, or PayPal for a fast and secure experience.
2-year warranty on all GPD products
2 Years Warranty from DROIX Global for your peace of mind
QUALITY ASSURANCE & PRE-DISPATCH TESTING
Ensuring Customer Satisfaction at the Highest Standard: Every device undergoes rigorous testing and a multi-point quality assurance check before it is shipped. Our dedicated team verifies performance, functionality, and component integrity to guarantee your GPD device is in perfect working order upon arrival, providing you with confidence and peace of mind.
Pricing, taxes & shipping
Note:
- United States Customers: The displayed price does NOT include TAX nor duties. Liability to clear customs and pay any associated tax/duties lies on the customer.
- EU Customers: The displayed price includes applicable TAX, which may be up to 25% depending on your country.
- Canada Customers: The displayed price includes applicable taxes, which may include 5% GST and additional Provincial Sales Taxes (PST), Harmonized Sales Tax (HST), or Quebec Sales Tax (QST), depending on your province.
For Our USA Customers: Orders are dispatched DAP (Delivered At Place). While customers are responsible for payment of any applicable tariffs, we draw on our extensive experience shipping from the UK to ensure you pay the least possible charge. Based on our records, these charges typically do not exceed 10% of the item value.
For EU Customers ONLY: Express DDP (Delivered Duty Paid). This means:
- All customs duties and taxes are included in the price displayed on the product page.
- You will not need to pay any additional charges upon delivery.
- In the rare event of customs-related issues, our team will handle the customs clearance process on your behalf to ensure a smooth delivery experience.
- If you decide to return your order or request a refund, please be aware that taxes and duties paid on your behalf under DDP terms cannot be refunded.
Important Information About Returns:
Please refer to our Terms & Conditions for detailed information.
Customer support
Got a question? We’re a short text away from having your issue sorted!
Please refer to our Terms & Conditions for detailed information.
What's included
- 1x DroiX PM14 Portable Monitor
- 1x Power Plug (EU/US)
- 1x HDMI Cable
- 1x USB Type-C Cable
- 1x USB Type-A to Type-C Cable
- 1x Protective Case
- 1x User Manual