In this article, we will guide you through the complete process of preparing and updating the BIOS of your GPD WIN 4 2023 and GPD WIN 4 2024 to the latest firmware version.
Please ensure you carefully follow the instructions and download the correct firmware file for your device variation. Incorrect and improper use or deviation from the instructions may render your device inoperable. GPD Store assumes no responsibility for any damages incurred.
How to identify your GPD WIN 4 model #
The GPD WIN 4 comes in in a few models, each requiring specific firmware. To ensure you download the correct firmware, start by identifying your model by checking your device’s CPU.
- Click on “CPU” if it is not already selected, and the CPU model will be displayed in the top right.
- In the Windows search bar, enter “Task Manager” and press ENTER
- The Task Manager software will open. Click on the “Performance” icon on the left side
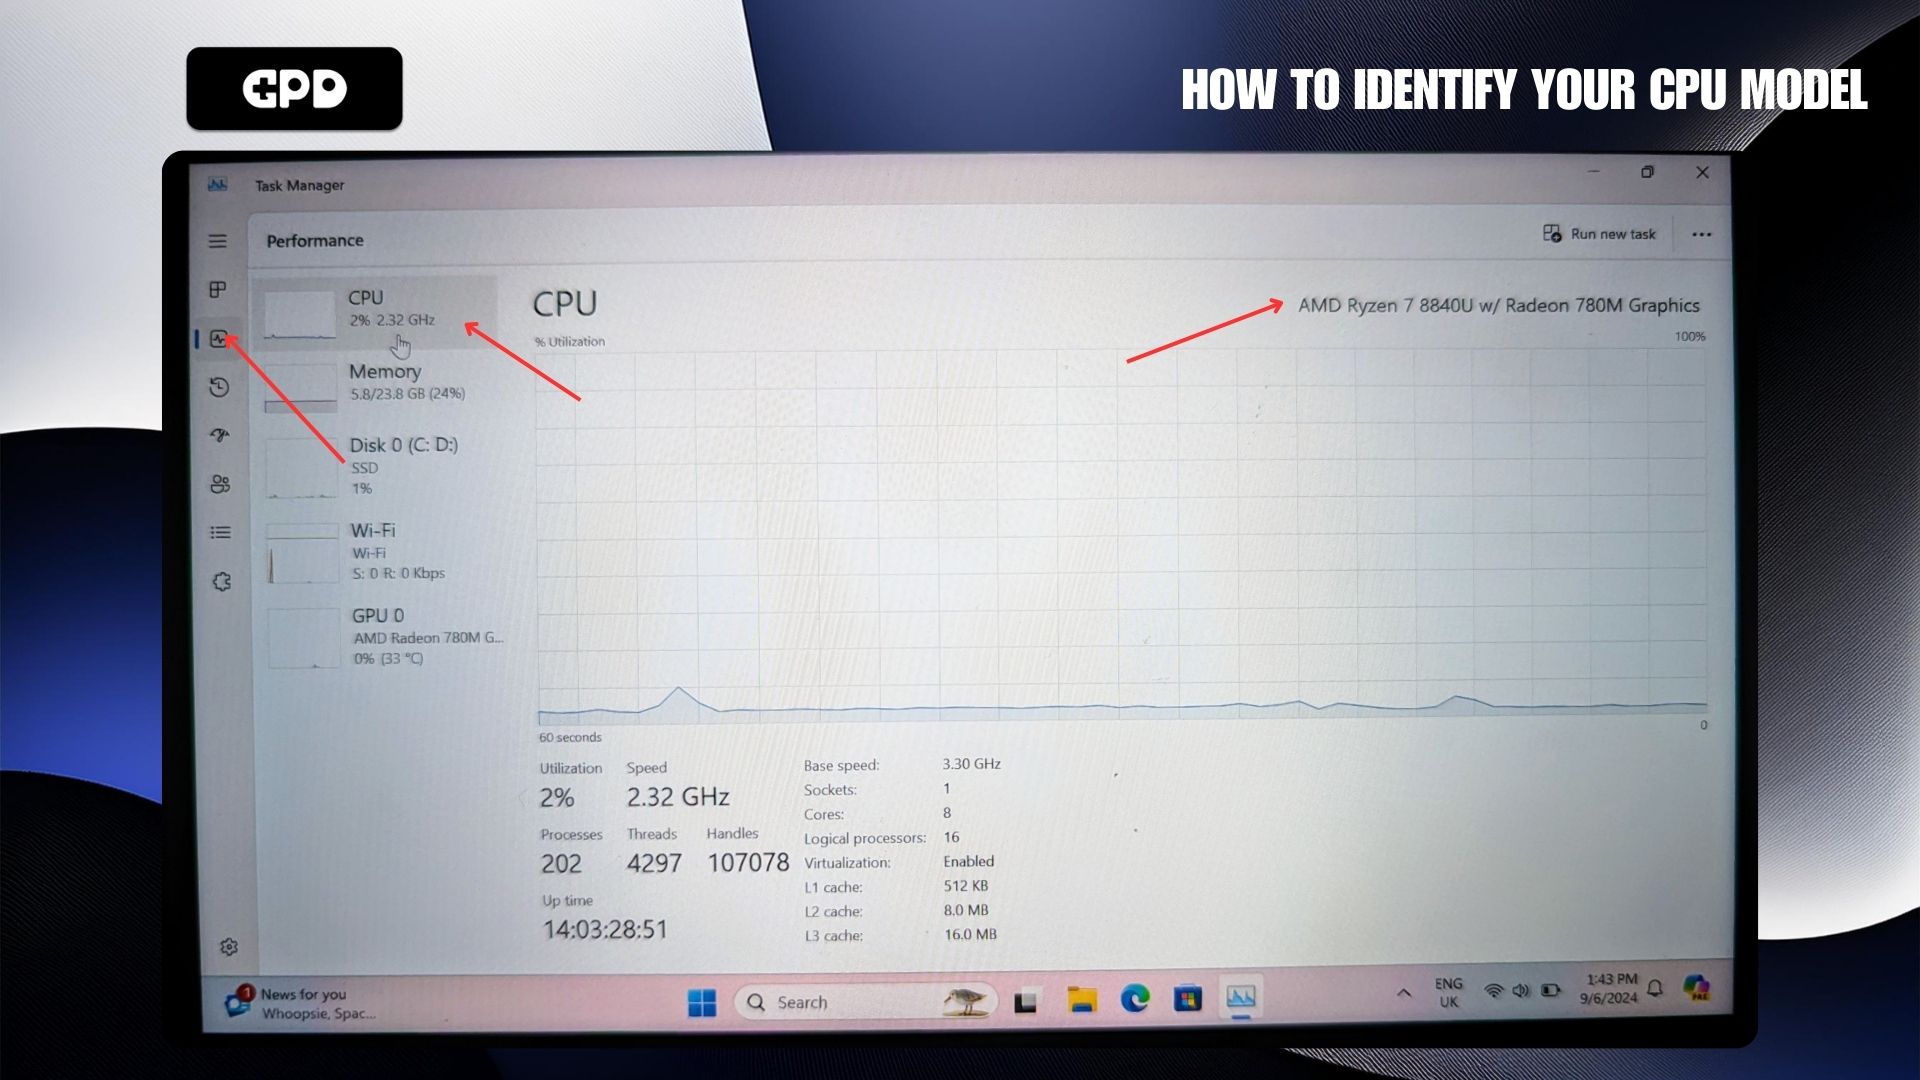
GPD WIN 4 (2023) – 7640U & 7840U CPU
GPD WIN 4 (2024) – 8840U CPU
In the example image above we have the 8840U model which is the GPD WIN 4 2024 (8840U). Once confirmed, proceed to download the appropriate firmware for your model.
Download Firmware Update #
You can download the latest BIOS update file for your respective model below and proceed. To correctly identify your model check your device’s CPU model (i.e., 6800U/7640U/7840U/8840U). We will continue to update these links for each new release.
GPD WIN 4 2023 (7640U/7840U) and 2024 (8840U) #
| FIRMWARE | DOWNLOAD |
| BIOS V0.60 | Download |
Updating GPD BIOS Video #
Installing the Firmware Update #
Prepare Firmware Update #
After downloading the firmware update, extract the contents to your PC. You should find a Readme.txt file, a startup.nsh file, and two folders: EFI and win4_BIOS_Release_V0.60 (or similarly named based on the firmware version).
Copy all of these files to a USB flash drive formatted with FAT32. Once the files are copied, safely eject the USB drive and insert it into your GPD WIN 4. Make sure to connect the power supply to the device before proceeding.
Installing the GPD WIN 4 BIOS Update #
Power on your GPD device and immediately press and hold the FN key while tapping the F7 key during startup. You may need to tap F7 multiple times to access the boot menu. Once the menu appears, select the USB drive as the boot device.
The BIOS update will now begin and take a few moments. During this time, do not remove the USB stick or turn off the device. It’s highly recommended to keep the device connected to a charger throughout the process. Once the update is complete, the device will automatically power down.
Powering on Your Device #
You can now power on your GPD WIN 4 and use it as normal.
Please note that since the BIOS update resets the BIOS, the first boot may take a few minutes and display a black screen while it processes the update. Do not turn off the device during this time. Subsequent boots will return to the normal fast speed you’re used to.
I was just wondering how I can find out if my device needs to be updated or not? I can’t tell if my drivers are outdated or not. I last updated it November but it’s been a while since I’ve kept up to date on any news.
Thank you!
BIOS updates will be added to the site when available. In terms of updating drivers, please see our guide at https://gpdstore.net/kb/software-guides/kb-article/how-to-update-windows-and-drivers-for-your-gpd/ for how to updte Windows in general as well as drivers etc. For the AMD GPU you can open the AMD software and check for updates on there, if I remember right a new update came out in mid December.
6800U 기종의 충전제한기능이 지원되는 bios가 출시될 계획이 있을까요?
우리가 아는 한 이에 대한 계획은 없습니다.
7840용이나 8840용 bios를 탑재하면 기기가 먹통이 될까요? 어떻게든 bios가 제공하는 충전제한 기능을 사용하고싶습니다 :/
다른 CPU나 모델에 대한 BIOS 업데이트를 설치하지 마십시오. 장치가 망가져서 사용할 수 없게 될 수 있습니다.
Is there an updated guide for the GPD Win 2025?
The guide’s screenshot says in MSINFO:
-Processor: Ryzen 7 6800u
-Bios version/date: AMI, LLC 3.05 28/04/2023
-SMBIOS version: 3.4
-Embedded controller version: 7.02
In my GPD it says the following:
-Processor ryzen ai 9 hx 370
-Bios date/version: AMI, llc 0.10, 28/11/2024
-SMBIOS version: 3.7
-Embedded controller version: 0.07
I am having issues with some drivers and sleep mode, so I’m unsure if I should update my BIOS.
Any help would be appreciated. Thanks
GPD have only just released the 2025 model and there will be a separate BIOS download for this model. Please do not install other versions as it may brick your device. We will update this guide soon for the 2025 model and how to update the BIOS.
6800U는 지원 되지 않겠죠??
배터리 과충전을 막기위해 충전제한 옵션 킬려고 하는데
바이오스의 지원버전에 6800U에 대한 언급은 없네요?
이것은 7840U(2023) 및 8840U(2024) 모델에만 해당됩니다. 6800U의 경우 https://drive.google.com/file/d/1lHTJUokYs5KxXWYDQcrotl4nL0wmIiv4/view?usp=sharing에서 최신 BIOS v3.06을 다운로드할 수 있습니다.
이 버전은 GPD WIN 4(6800U)에 Linux가 설치된 경우 절전 모드에서 깨어난 후 볼륨 키가 응답하지 않는 문제를 해결합니다. 또한 v3.04에서 하단의 C 포트가 표시되지 않는 문제를 해결하고 비정상적인 조건에서 장치가 충돌할 수 있는 일부 문제를 해결합니다. 또한 화면 펌웨어 업그레이드 인터페이스를 제공하여 화면 펌웨어 업데이트에 대한 지원을 추가합니다. 장치에서 이러한 문제가 발생하지 않으면 업그레이드하지 마십시오.
감사합니다 브로