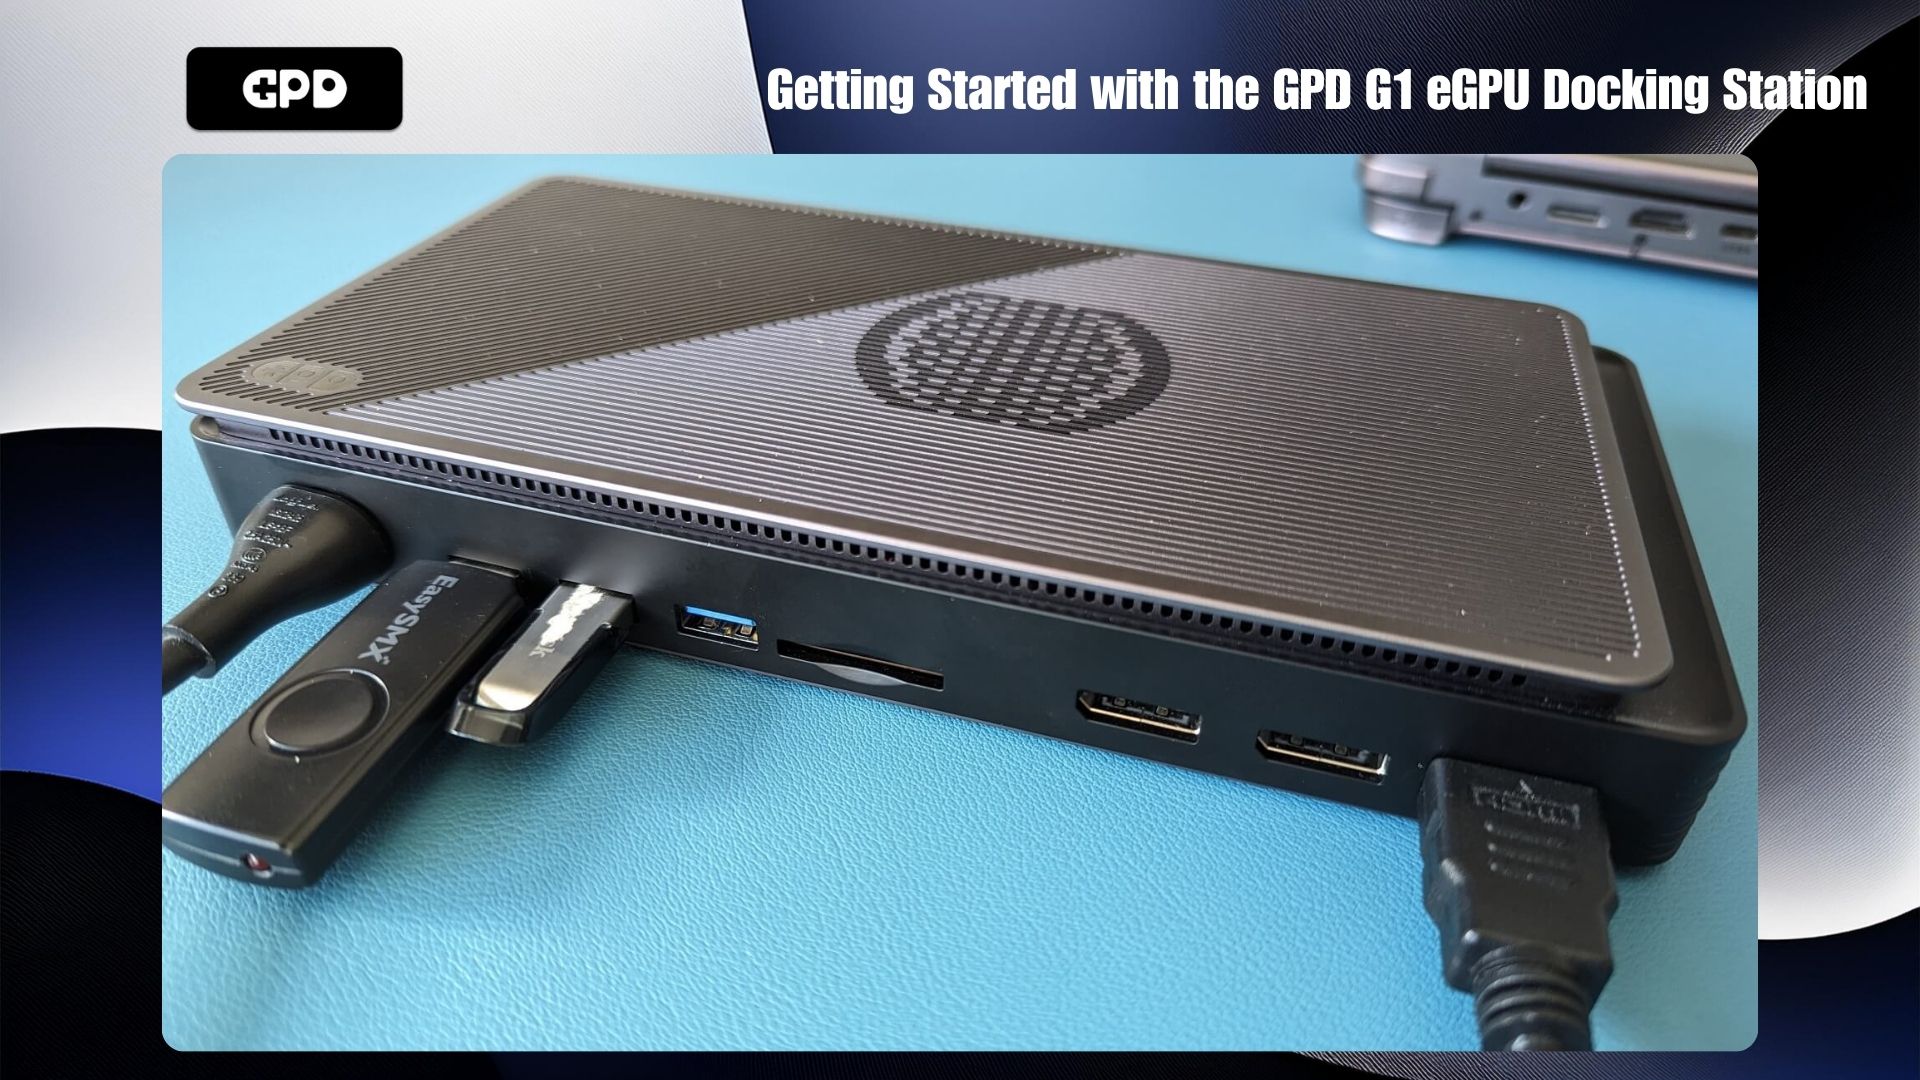
Congratulations on purchasing the GPD G1 eGPU docking station! The G1 adds a wide range of connectivity options for your handheld or mini PC, including three USB-3 ports, an SD card reader, two HDMI ports, and a DisplayPort. With the ability to connect via OCuLink or USB 4.0, you can transform your compatible device into a high-performance gaming PC. This getting started with the GPD G1 eGPU docking station will help you set up, use, and troubleshoot.
If you need further assistance or can’t find the information you’re looking for, don’t hesitate to contact our customer service. We’re here to help!
Setting Up Your GPD G1 eGPU Docking Station #
Setting up the GPD G1 eGPU docking station is quick and straightforward. You can connect peripherals such as a USB mouse, keyboard, or USB stick using the three available USB ports. For display, you have the option to connect one or more monitors using the two HDMI ports or the DisplayPort. If your display supports DisplayPort, we recommend using it for the best experience, although HDMI will work just as well.
For certain devices, like the GPD WIN MAX 2 2024, and GPD WIN 4 2024, an OCuLink port is available. If you have one of these newer devices, you can benefit from faster data transfer speeds. Otherwise, you can connect via USB 4.0, which is supported by other devices, including the AYANEO series, older GPD models, ONEXPLAYER, and AOKZOE handhelds.
Connecting with OCuLink #
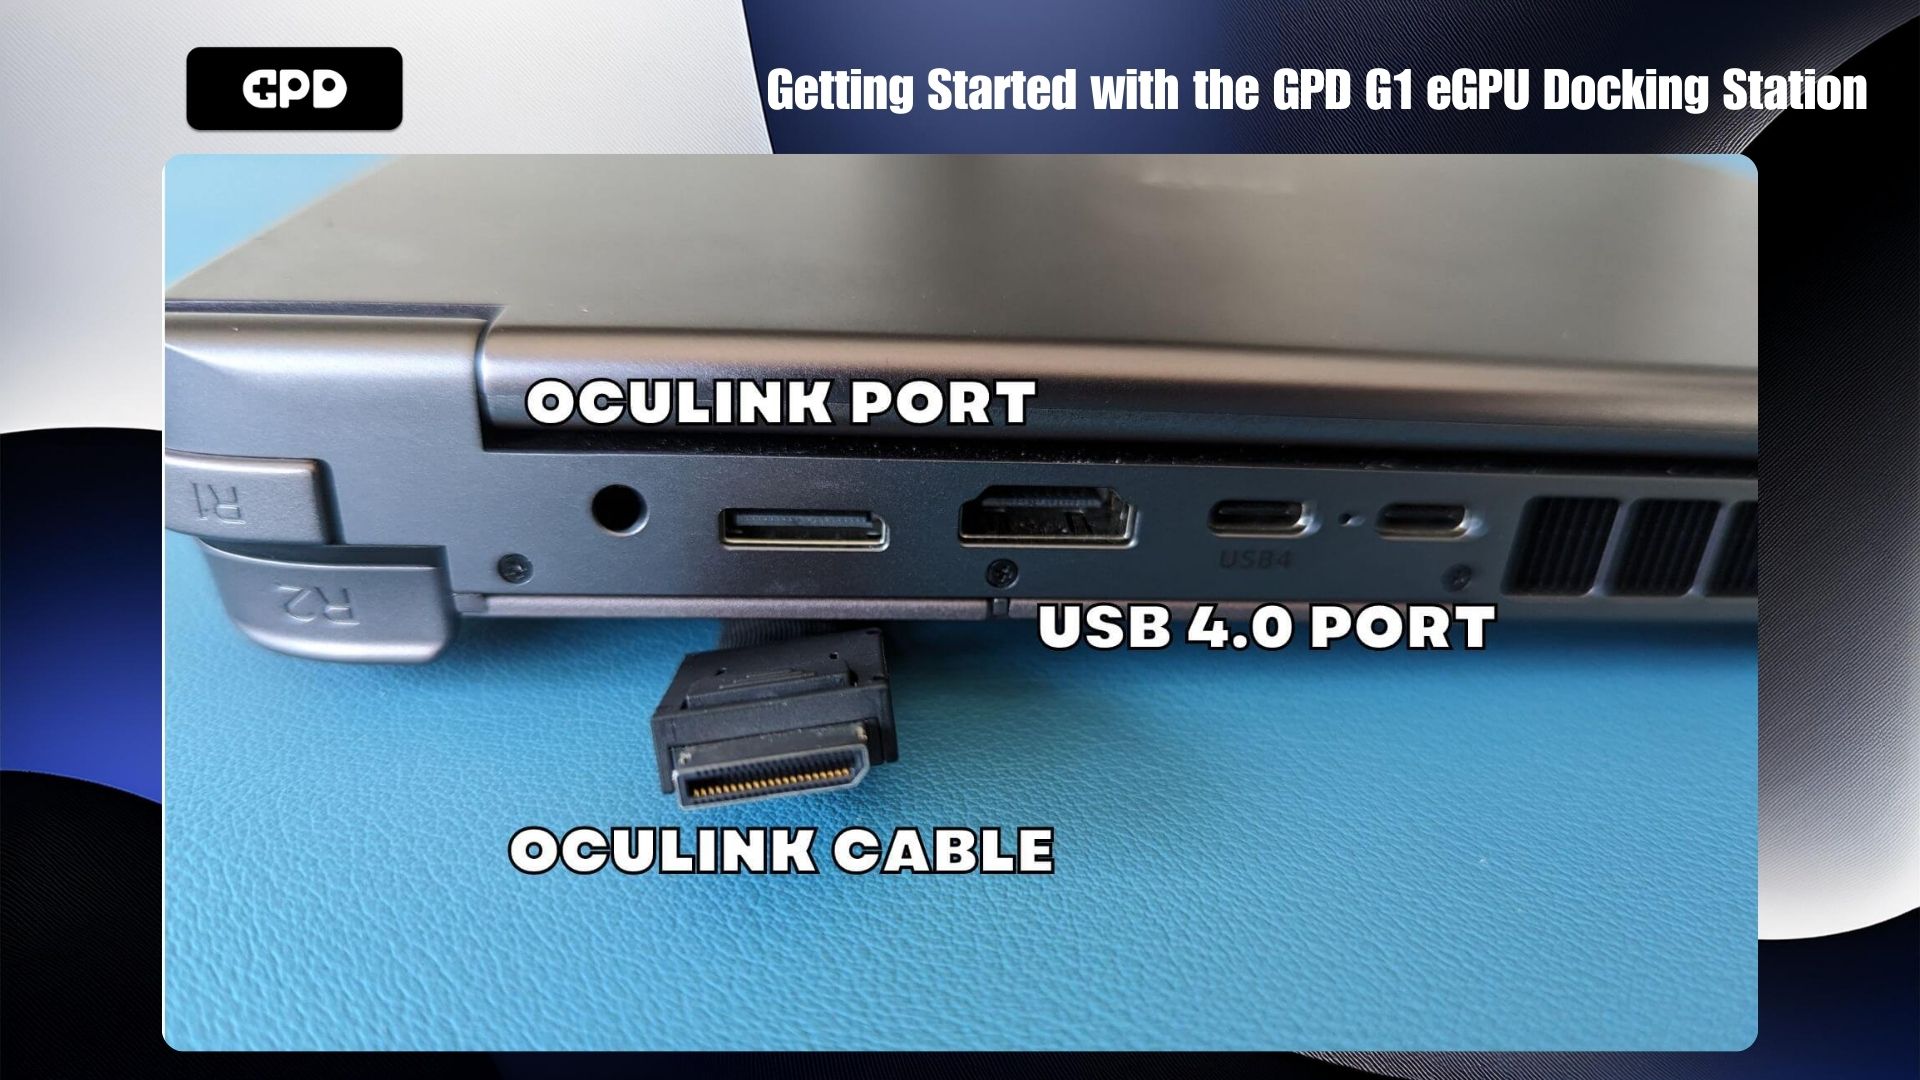
If you’re using the OCuLink connection, remember to connect both the OCuLink cable and the USB 4 cable if you want to use the docking station’s ports. The USB connection is necessary for USB peripherals, the SD card reader, and video outputs. Make sure both the GPD G1 and your device are powered off before connecting the OCuLink and/or USB 4.0 cables.
Connecting Without OCuLink #
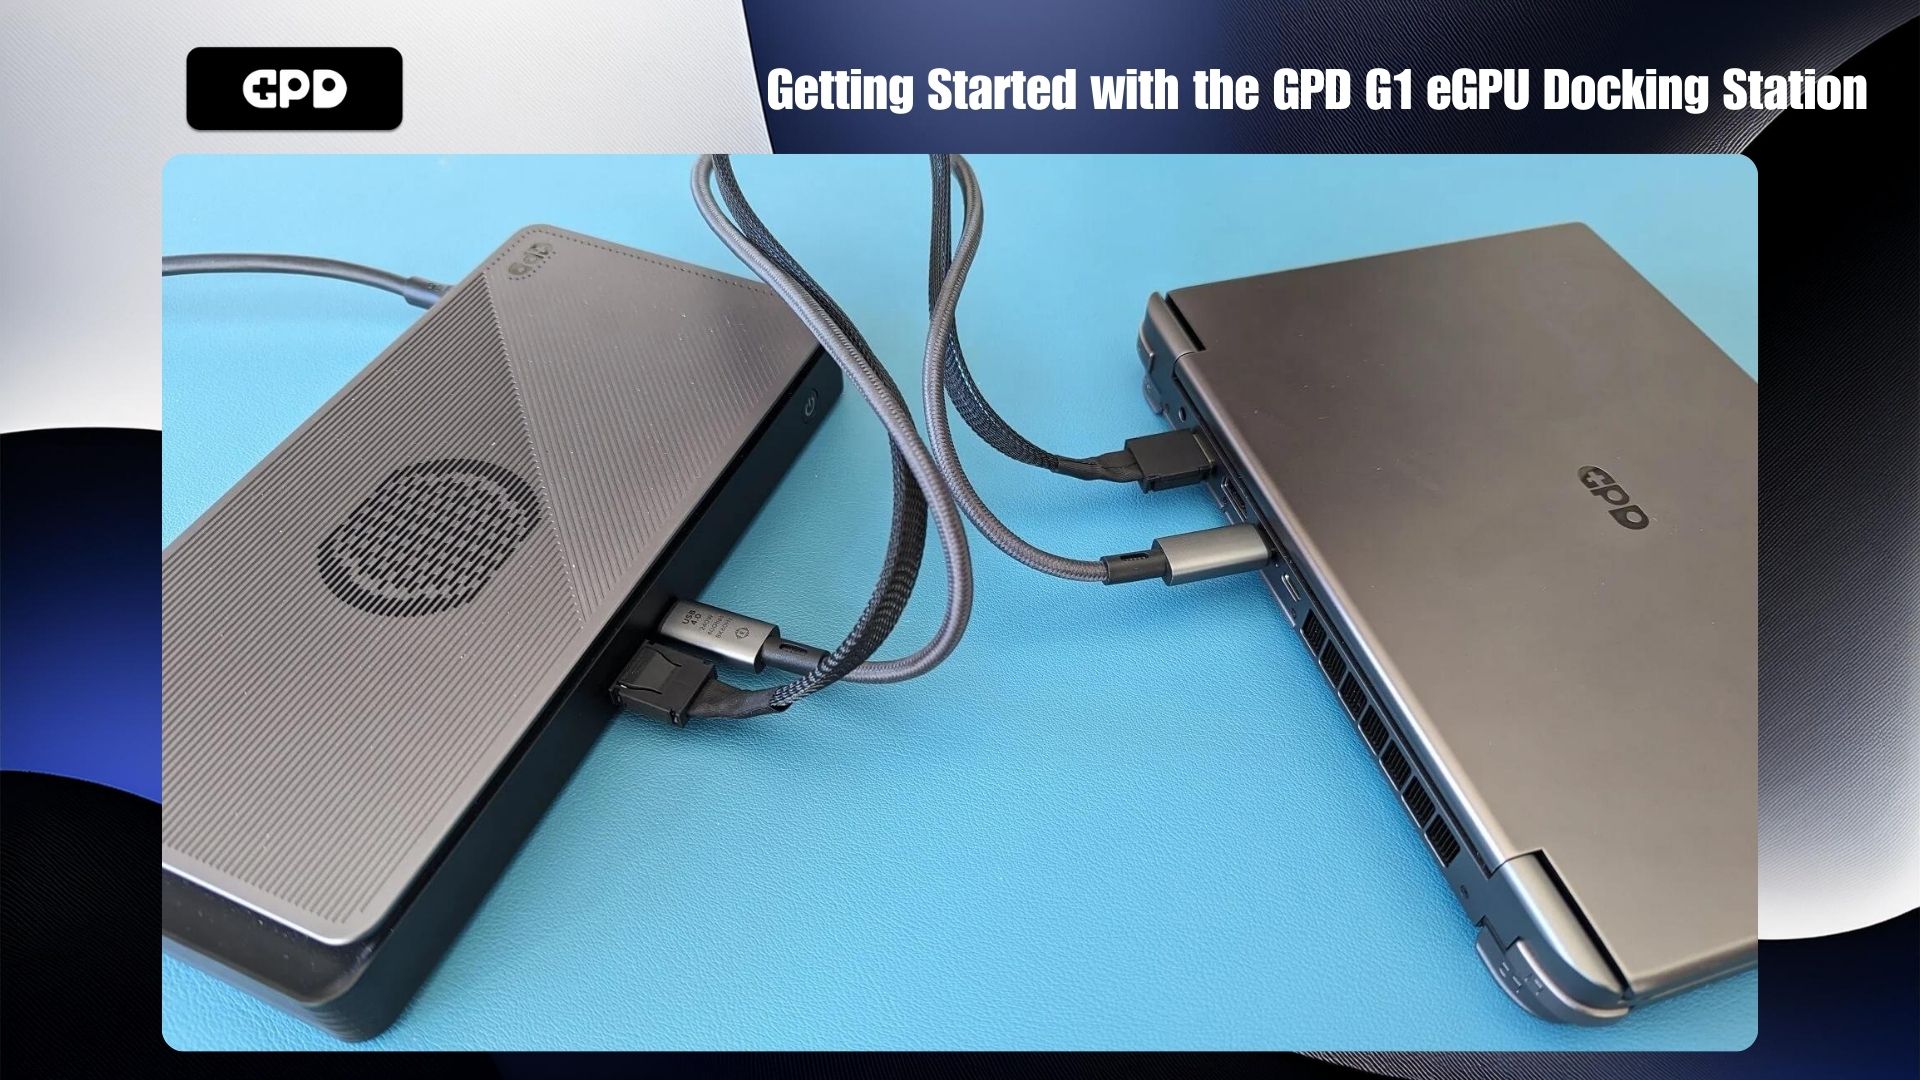
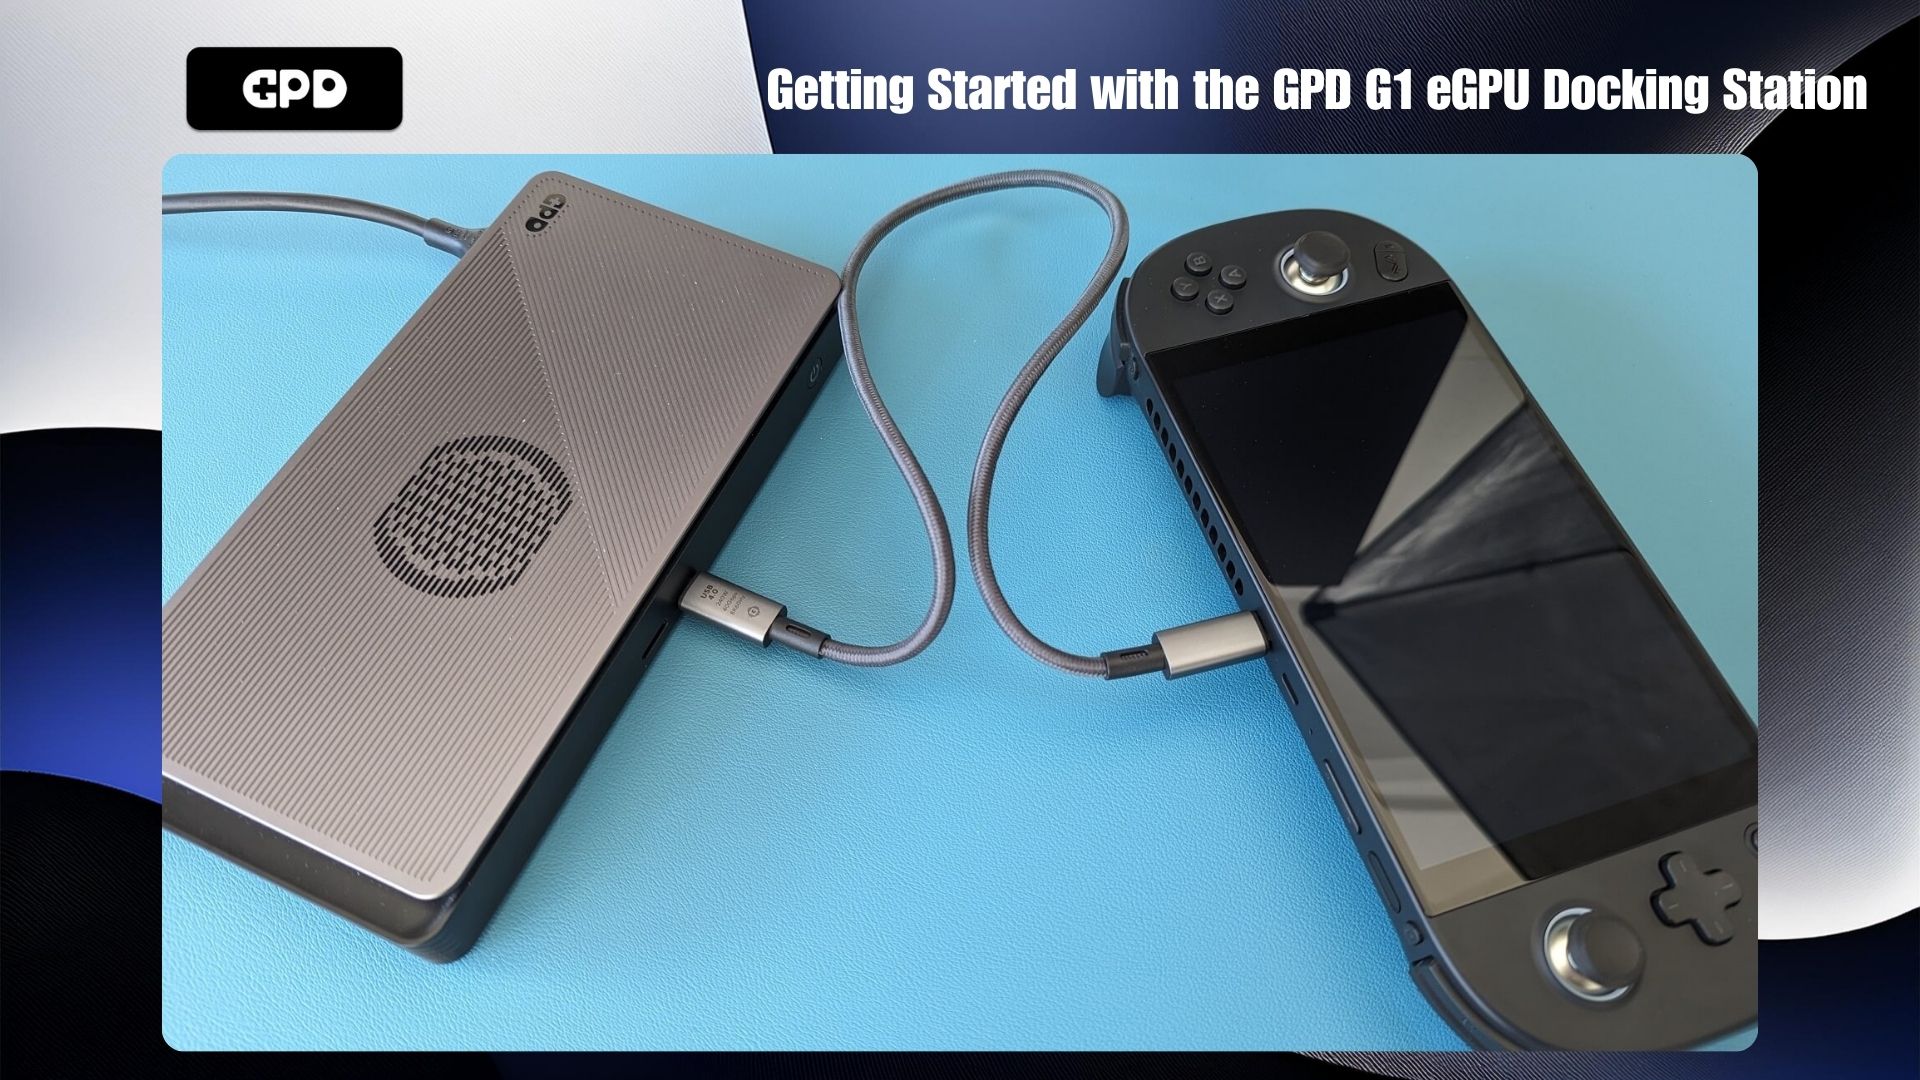
If your device doesn’t have an OCuLink port, simply connect the USB 4 cable between the GPD G1 and your device. Be sure to double-check which port on your device supports USB 4.0, as some ports may not be compatible.
Powering On #
Once all connections are in place, power on the GPD G1 eGPU docking station first. Wait a few seconds, then turn on your device. After a short moment, your device will boot into Windows, and you’ll be ready to enjoy enhanced performance with your GPD G1!
Updating & Installing AMD Graphics Drivers #
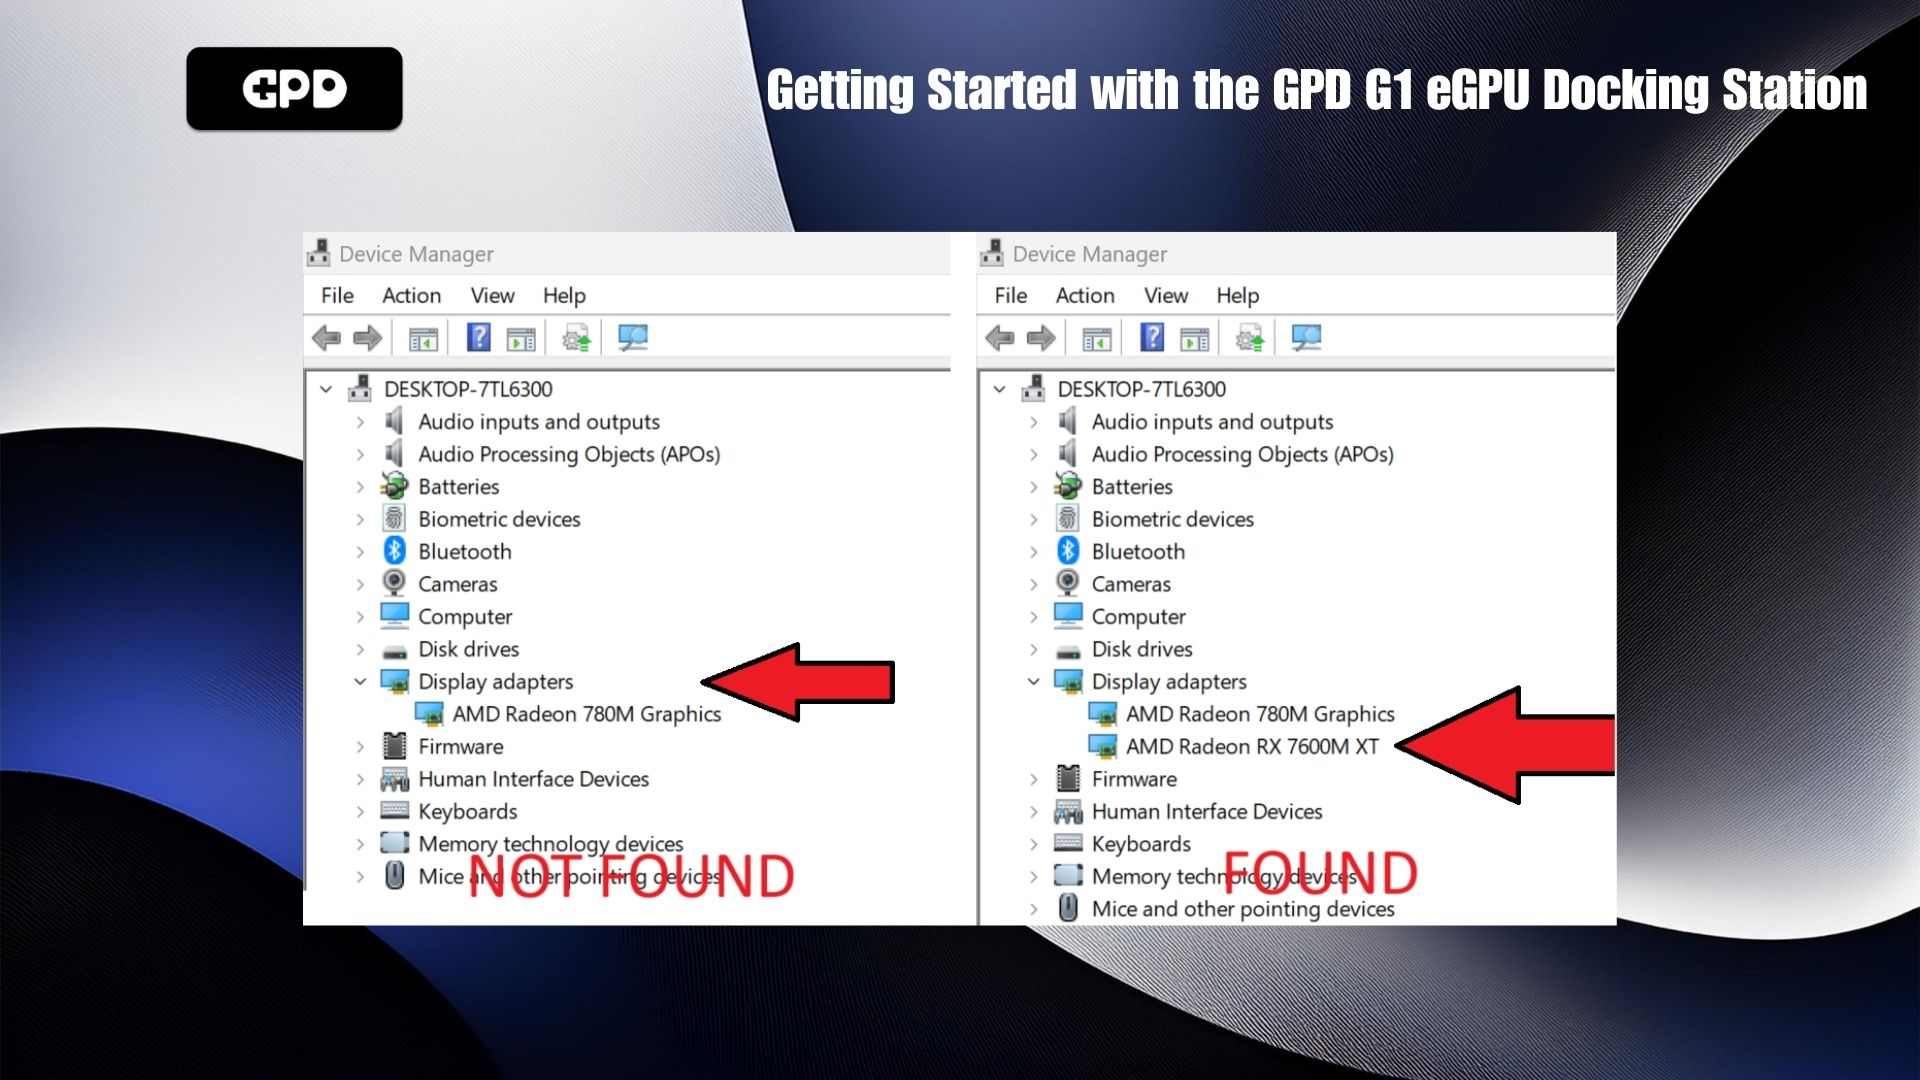
If your graphics drivers are already up to date, the GPD G1 may automatically set up and install the necessary drivers. To confirm, go to Windows Device Manager > Display Devices. If you see the AMD Radeon RX 7600M XT listed, the drivers have been successfully installed.
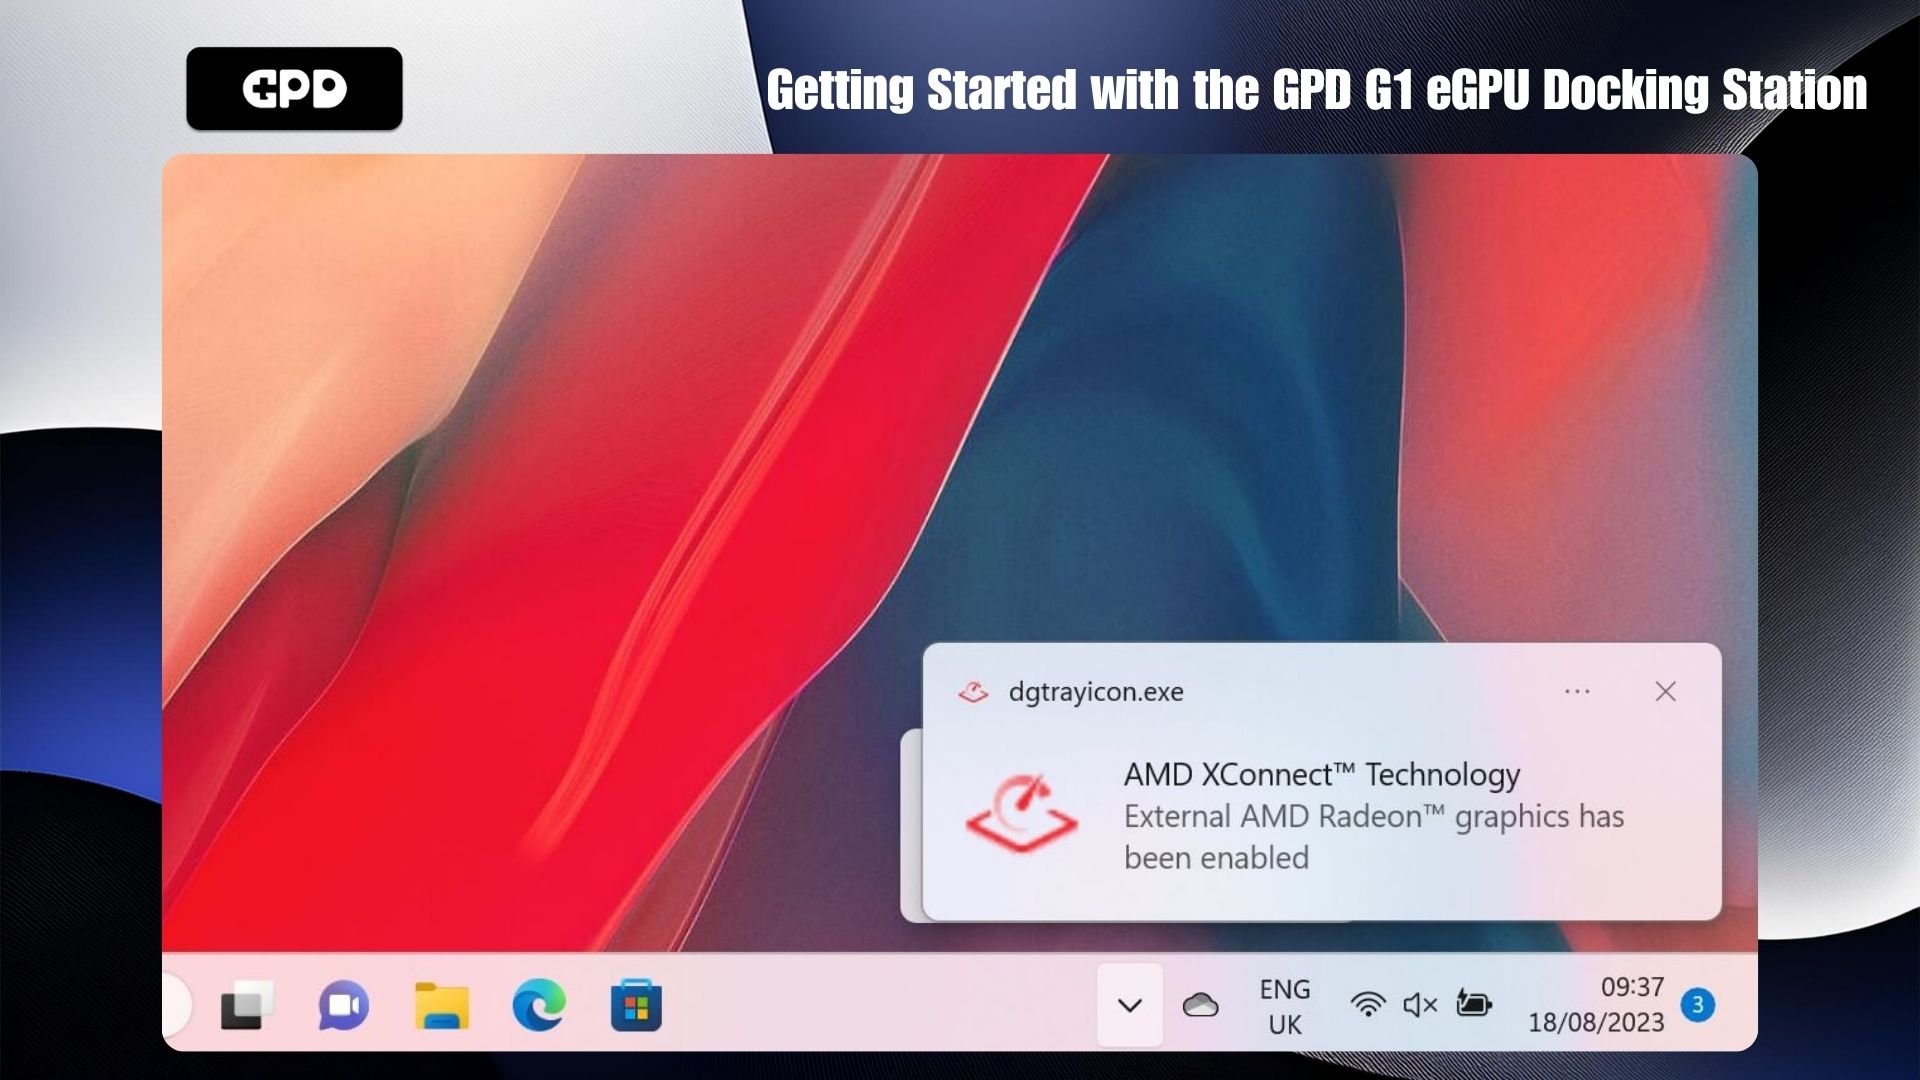
When connected via USB 4 only, you should also receive a notification indicating that AMD XConnect Technology has been enabled. This notification will not display if OCuLink is used.
Troubleshooting & Updating Drivers #
If the eGPU is not detected or you wish to update to the latest drivers, follow our step-by-step guide here: How to Uninstall and Install AMD Graphics Drivers.
After updating or installing the drivers, shut down your device and then turn off the GPD G1. Wait a few moments, power on the GPD G1 first, and then turn on your device.
Verifying Installation #
Once Windows has booted up again, check that the AMD Radeon RX 7600M XT appears under Windows Device Manager > Display Devices. If it doesn’t show up, switch off the GPD G1, wait ten seconds, and then turn it back on. The AMD Radeon RX 7600M XT should now be listed in Display Devices.
Updating the GPD G1 BIOS (Optional) #
If you need to update your GPD G1’s BIOS, the process is simple and straightforward. You can follow our dedicated G1 BIOS Update guide.
Troubleshooting Your GPD G1 eGPU #
Why Are Games Running Slower Than Expected? #
If your games are running slower than anticipated, several factors could be causing the issue. Here are some steps you can take to troubleshoot:
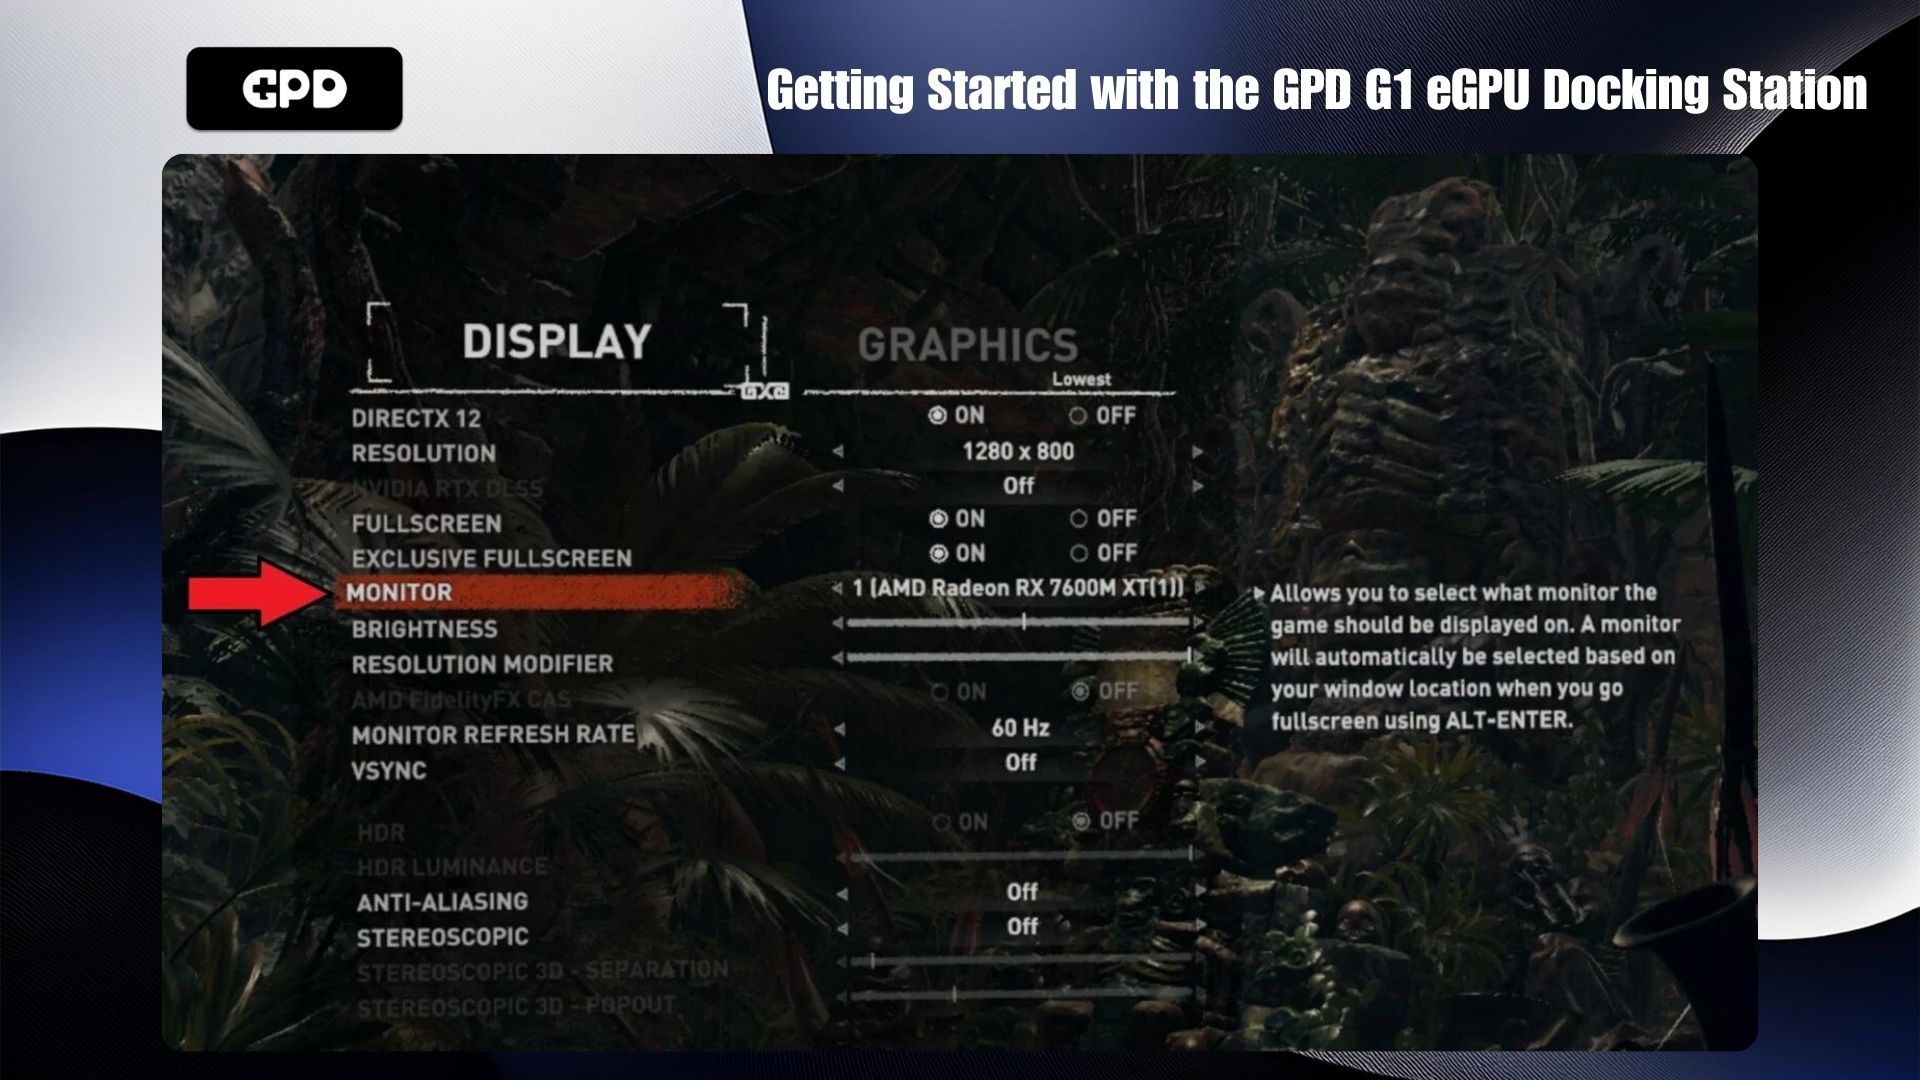
Ensure the Game Is Using the Correct GPU: Verify that the game is utilizing the AMD Radeon RX 7600M XT eGPU instead of your device’s internal graphics, like the AMD Radeon 780M. Check the game’s video or display settings to see if there’s an option to select the GPU. This setting might be listed under names like “GPU” or “Monitor.”
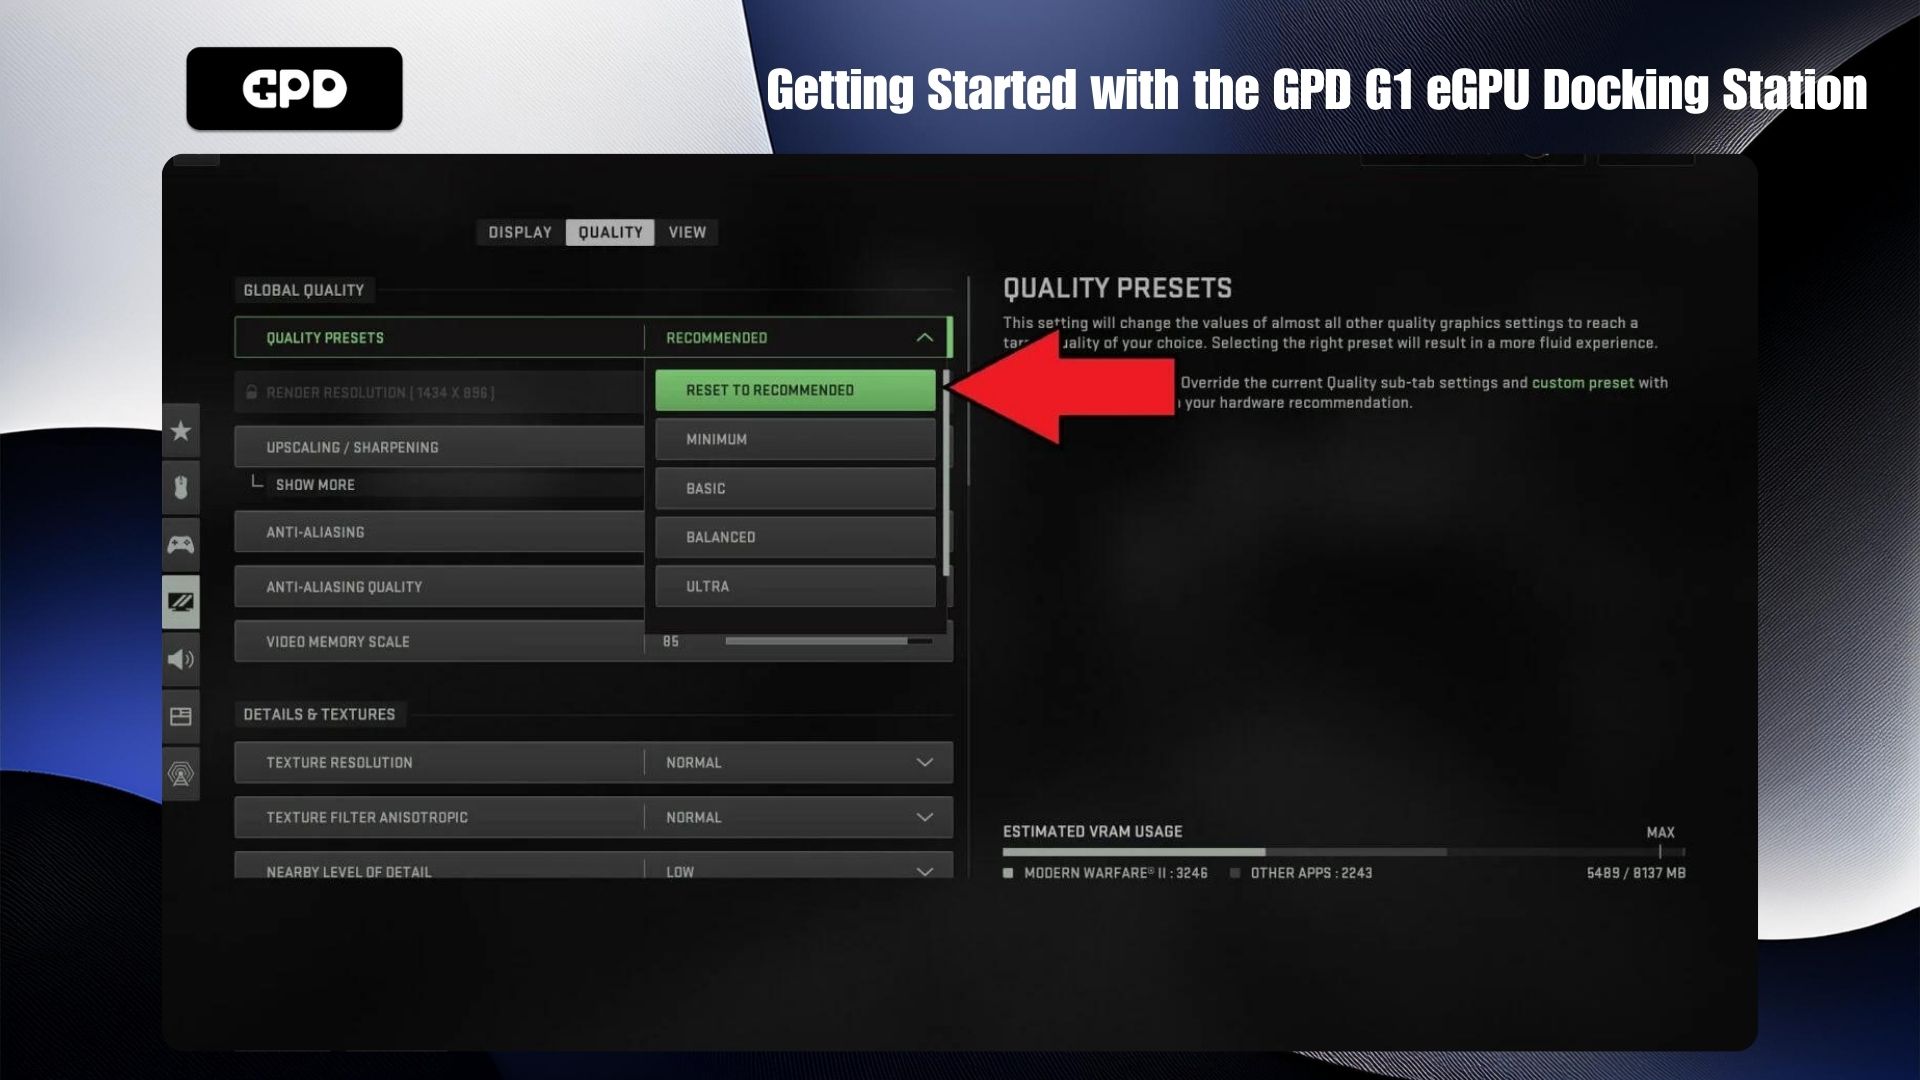
Adjust Game Video Settings: If the video settings are too high, the game may not perform as expected. Many games offer recommended settings that automatically optimize graphics based on your hardware. If issues persist, try lowering the screen resolution to 1440P, 1080P, or even 720P. Alternatively, start with lower default graphics settings and gradually increase them until performance starts to degrade. Then revert to the previous stable setting.
Internal Display Considerations: Using the internal display of your handheld can reduce the eGPU’s efficiency. This is because data must travel from the handheld to the GPD G1 and back again, consuming twice the bandwidth through the USB 4 cable. To improve performance, it’s recommended to use an external display when possible, as this requires less bandwidth and boosts efficiency.
AMD Radeon RX 7600M XT Not Detected #
If your device is not detecting the AMD Radeon RX 7600M XT, follow these steps:
Ensure Device Compatibility: Make sure your device supports either OCuLink or USB 4.0. Check that all cables are securely inserted into the correct ports on both ends.
Using USB 4: If your device lacks an OCuLink port, confirm that you are connecting to a USB 4 port. If your device has multiple Type-C ports, refer to the manual to identify the correct USB 4.0 port.
Power Cycle the GPD G1: Try switching off the GPD G1, wait a few moments, and then turn it back on. Windows should recognize the device, and you may hear the default USB connection sound. If connected via USB 4, you should also receive a notification that AMD XConnect Technology has been enabled.
Reinstall the Drivers: Sometimes, conflicts may occur between newer and older driver versions. Try reinstalling the drivers by following the steps in the guide above to fully uninstall and reinstall fresh drivers.
Resolving GPD G1 Connectivity Issues #
To use the additional ports on the GPD G1, the USB cable must be connected, as the OCuLink cable only transfers data for the GPU. A USB 4.0 cable is included with the GPD G1, and it’s recommended to use this specific cable. Other cables might be USB 3.0 or simply charging cables, which won’t provide the necessary functionality.
Where to buy OCuLink and USB 4.0 cables #

USB 4.0 Type-C Cable #
- 40Gbps Data Transfer Speed
- Thunderbolt 3 & 4
- Up to 240W Power Delivery
- Supports up to 8K @ 60Hz Video Output
- Built-In Wattage Display
PAYMENT INFO
We use the latest technology in Payment Processing, which allows you to checkout via your Debit/Credit Card, or PayPal for a fast and secure experience.
WARRANTY
1 or 2 Year* Warranty from DroiX Global for your peace of mind[/cg_accordion
PRICING, TAXES AND SHIPPING
Note:
• United States Customers: The displayed price includes all applicable taxes.
• EU Customers: The displayed price includes applicable TAX, which may be up to 25% depending on your country.
• Canada Customers: The displayed price includes 5% GST.
SHIPPING AND RETURNS
Organised by DroiX, an official GPD Distributor, we ship using DHL Express DDP (Delivered Duty Paid). This means:
Express DDP (Delivered Duty Paid). This means:
• All customs duties and taxes are included in the price displayed on the product page.
• You will not need to pay any additional charges upon delivery.
• In the rare event of customs-related issues, our team will handle the customs clearance process on your behalf to ensure a smooth delivery experience.
Important Information About Returns:
• If you decide to return your order or request a refund due to a change of mind, please be aware that taxes and duties paid on your behalf under DDP terms cannot be refunded.
Please refer to our Terms & Conditions for detailed information.
WHAT’S INCLUDED
- 1x USB 4.0 Type-C Cable

GPD OCuLink SFF8611 Cable & M.2 8612 Adapter Card #
- Official GPD OCuLink Cable & Adapter
- Compatible With GPD G1 eGPU
- Adapter For Devices Without OCuLink
- Support for PCIe Gen 4.0 & 5.0
- Speeds Up To 16GT/s & 32 GT/s Per Lane
PAYMENT INFO
We use the latest technology in Payment Processing, which allows you to checkout via your Debit/Credit Card, or PayPal for a fast and secure experience.
WARRANTY
2 Years Warranty from DroiX Global for your peace of mind
PRICING, TAXES AND SHIPPING
Note:
• United States Customers: The displayed price includes all applicable taxes.
• EU Customers: The displayed price includes applicable TAX, which may be up to 25% depending on your country.
• Canada Customers: The displayed price includes 5% GST.
SHIPPING AND RETURNS
Organised by DroiX, an official GPD Distributor, we ship using DHL Express DDP (Delivered Duty Paid). This means:
Express DDP (Delivered Duty Paid). This means:
• All customs duties and taxes are included in the price displayed on the product page.
• You will not need to pay any additional charges upon delivery.
• In the rare event of customs-related issues, our team will handle the customs clearance process on your behalf to ensure a smooth delivery experience.
Important Information About Returns:
• If you decide to return your order or request a refund due to a change of mind, please be aware that taxes and duties paid on your behalf under DDP terms cannot be refunded.
Please refer to our Terms & Conditions for detailed information.
WHAT’S INCLUDED
- 1x GPD OCuLink SFF8611 Cable
- 1x M.2 8612 Adapter Card

GPD G1 eGPU Docking Station – Protective Case #
- Official GPD G1 eGPU Case
- Small Yet Secure
- Sleek & Stylish Design
- Soft Lined Interior
- Snug Fit For The GPD G1
PAYMENT INFO
We use the latest technology in Payment Processing, which allows you to checkout via your Debit/Credit Card, or PayPal for a fast and secure experience.
WARRANTY
2 Years Warranty from DroiX Global for your peace of mind
PRICING, TAXES AND SHIPPING
Note:
• United States Customers: The displayed price includes all applicable taxes.
• EU Customers: The displayed price includes applicable TAX, which may be up to 25% depending on your country.
• Canada Customers: The displayed price includes 5% GST.
SHIPPING AND RETURNS
Organised by DroiX, an official GPD Distributor, we ship using DHL Express DDP (Delivered Duty Paid). This means:
Express DDP (Delivered Duty Paid). This means:
• All customs duties and taxes are included in the price displayed on the product page.
• You will not need to pay any additional charges upon delivery.
• In the rare event of customs-related issues, our team will handle the customs clearance process on your behalf to ensure a smooth delivery experience.
Important Information About Returns:
• If you decide to return your order or request a refund due to a change of mind, please be aware that taxes and duties paid on your behalf under DDP terms cannot be refunded.
Please refer to our Terms & Conditions for detailed information.
WHAT’S INCLUDED
- 1x GPD G1 Case