Congratulations on your purchase of the new DroiX SD1 Docking Station! You’ve just taken the first step toward enhancing your handheld gaming PC experience. This Getting Started guide will help you unlock the full potential of your DroiX SD1, from its three USB 3.0 ports to 4K gaming at 60Hz, along with a 1000Mbps ethernet connection. We’re here to assist you at every stage. So, get ready as we embark on this exciting journey to elevate your gaming adventures!
At GPD Store, we strongly support the Right to Repair. If you encounter any issues and feel confident enough to handle the repairs yourself, we encourage you to do so! Of course, GPD Store Customer Support is always available to help with any questions or assistance you might need.
What’s in the Box? #
As you prepare to set up, make sure you have all the necessary components and accessories. While unboxing, be sure to handle the docking station carefully to avoid any potential damage. Inside the box, you should find:
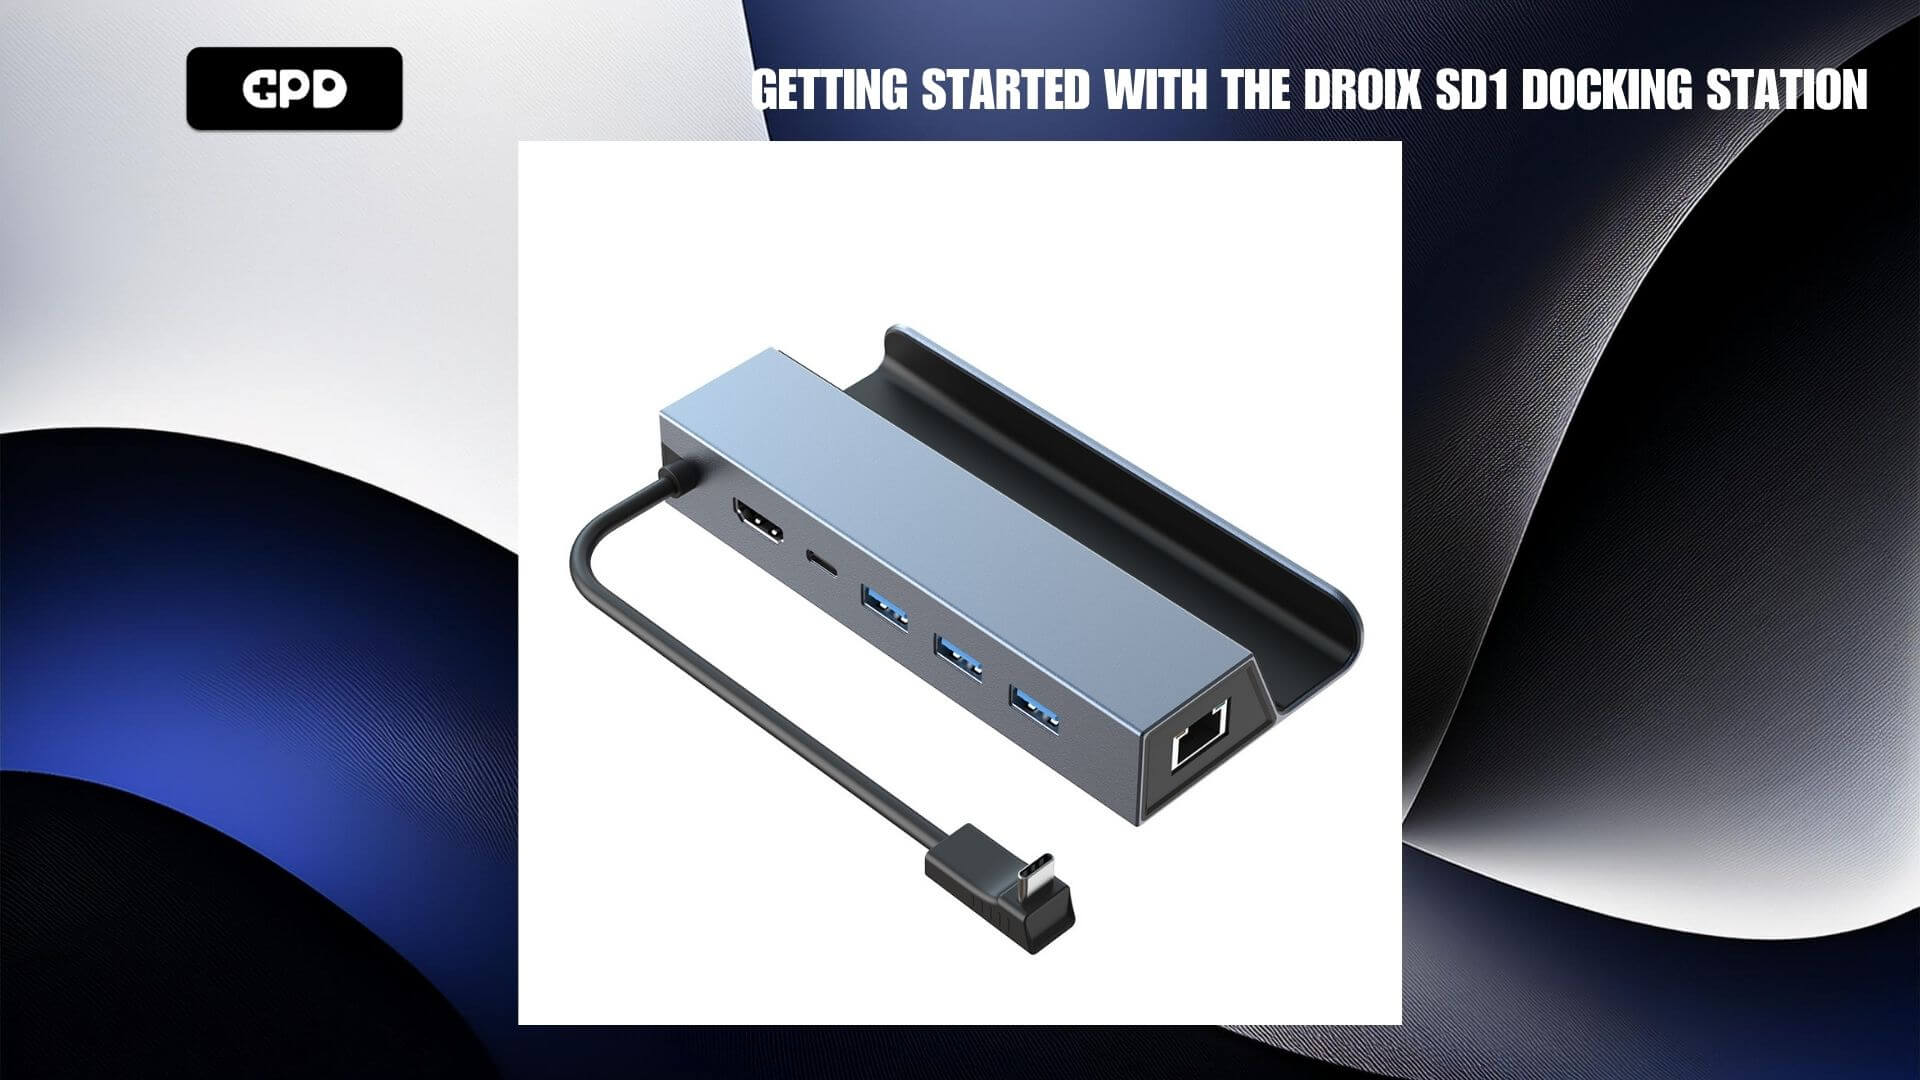
- 1x DroiX SD1 Docking Station
If anything is missing or you’re unsure about any items, feel free to contact GPD Store Customer Service, and we’ll be happy to assist you.
Testing Your Hardware #
After completing the initial setup, it’s important to test your DroiX SD1 Dock to ensure everything is functioning as expected. If a specific test doesn’t work properly, try using different cables to determine whether the issue lies with the cable or the dock. During troubleshooting, make sure all cables are securely connected to the appropriate ports.
DroiX SD1 Docking Station #
- Physical Damage: Inspect the dock’s outer casing for any signs of damage.
- Dock Connection: Connect your handheld device to the DroiX SD1 Dock. To verify that the device is recognized, refer to either the PD port test or the HDMI test.
- USB-C PD Port: Plug your charger into the PD port at the back of the dock to ensure your device is charging.
- USB-A 3.0 Ports: Plug various USB devices into each USB Type-A port and confirm that each one is recognized and functioning as expected.
- HDMI Port: Turn on both your device and display, then switch to the correct HDMI input. If the display shows an image, the port is working correctly.
- Ethernet Port: Ensure the ethernet cable is plugged into both the dock and your router or modem. Then check if your handheld device has internet access through the ethernet connection.
Other Troubleshooting #
- Device Not Charging: Some devices have multiple ports, but only certain ones are dedicated for charging. Make sure you’re using the correct port as per your device’s manual.
- No Display: Some devices have specific ports for charging that do not transfer data. Try using different ports and consult your handheld product manual to understand which ports are used for charging and which are for data transfer.
What you can do with the DroiX SD1 Docking Station #
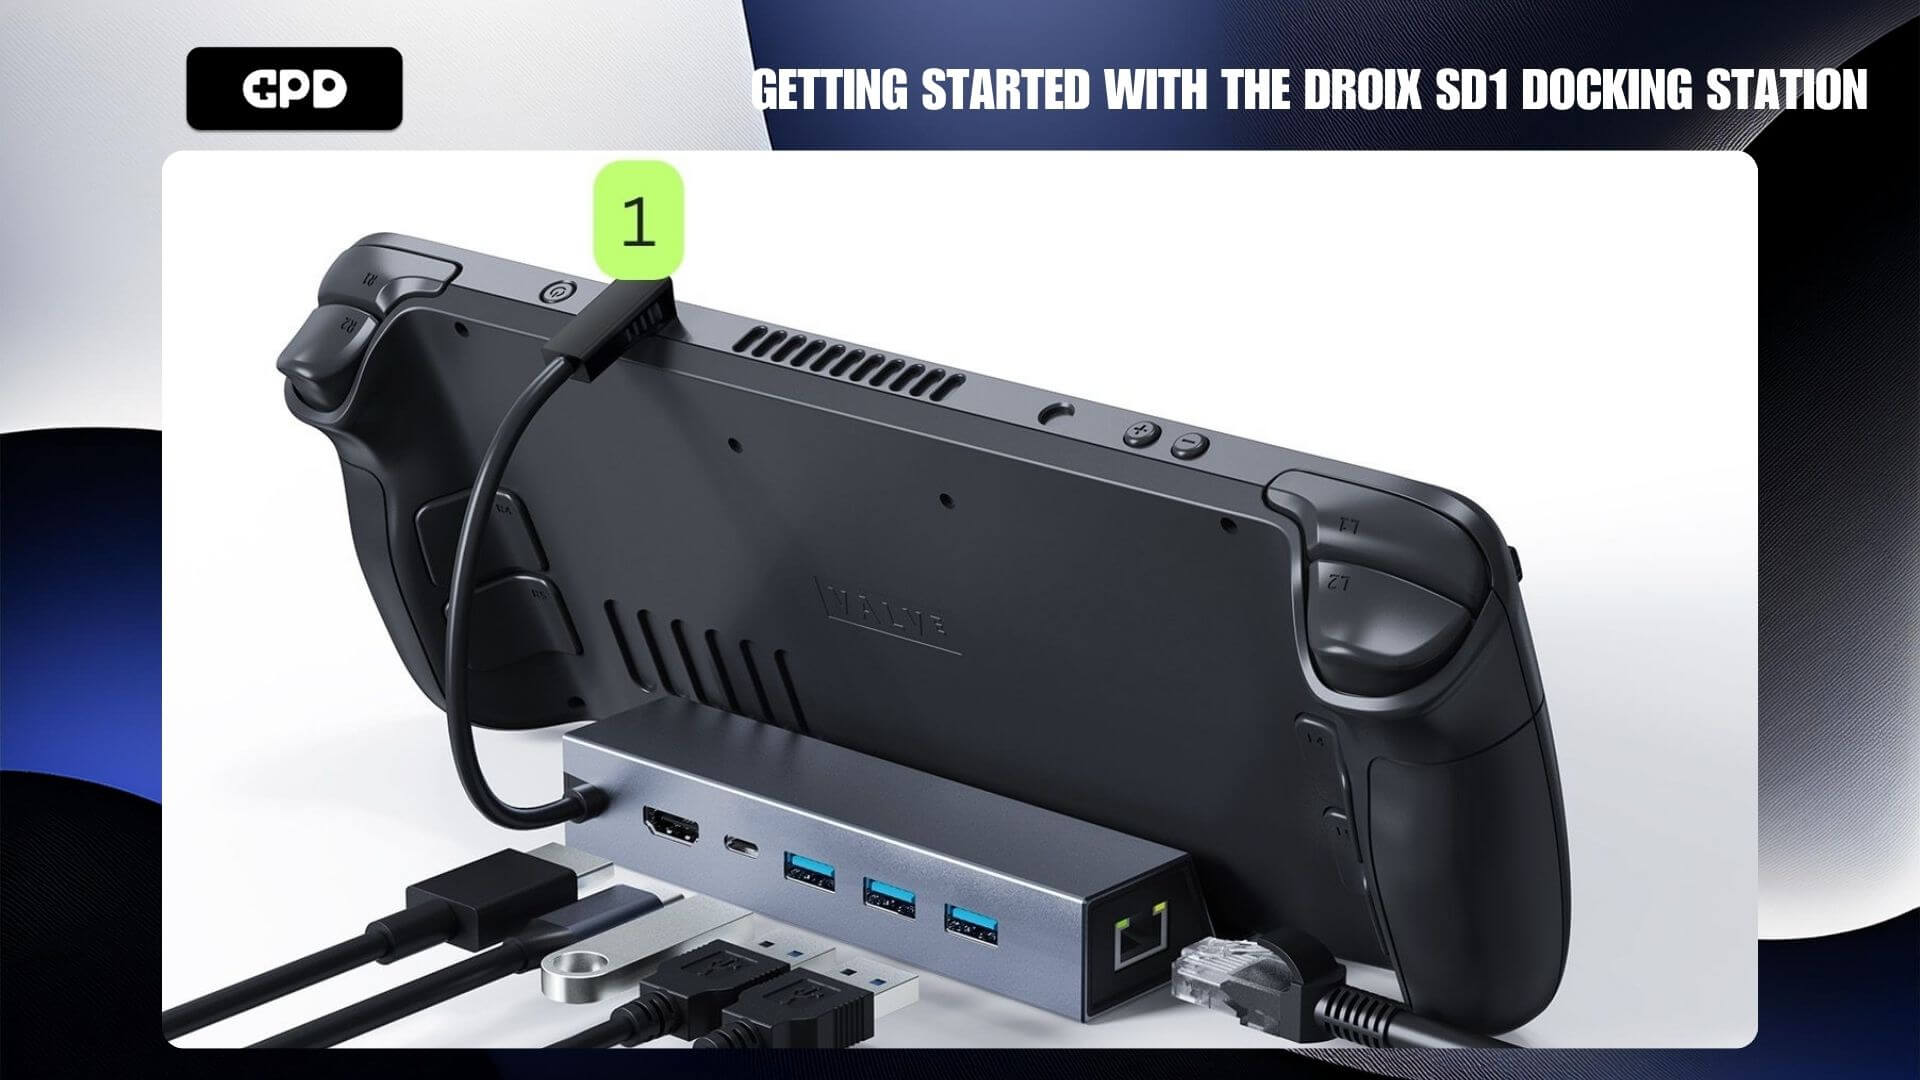
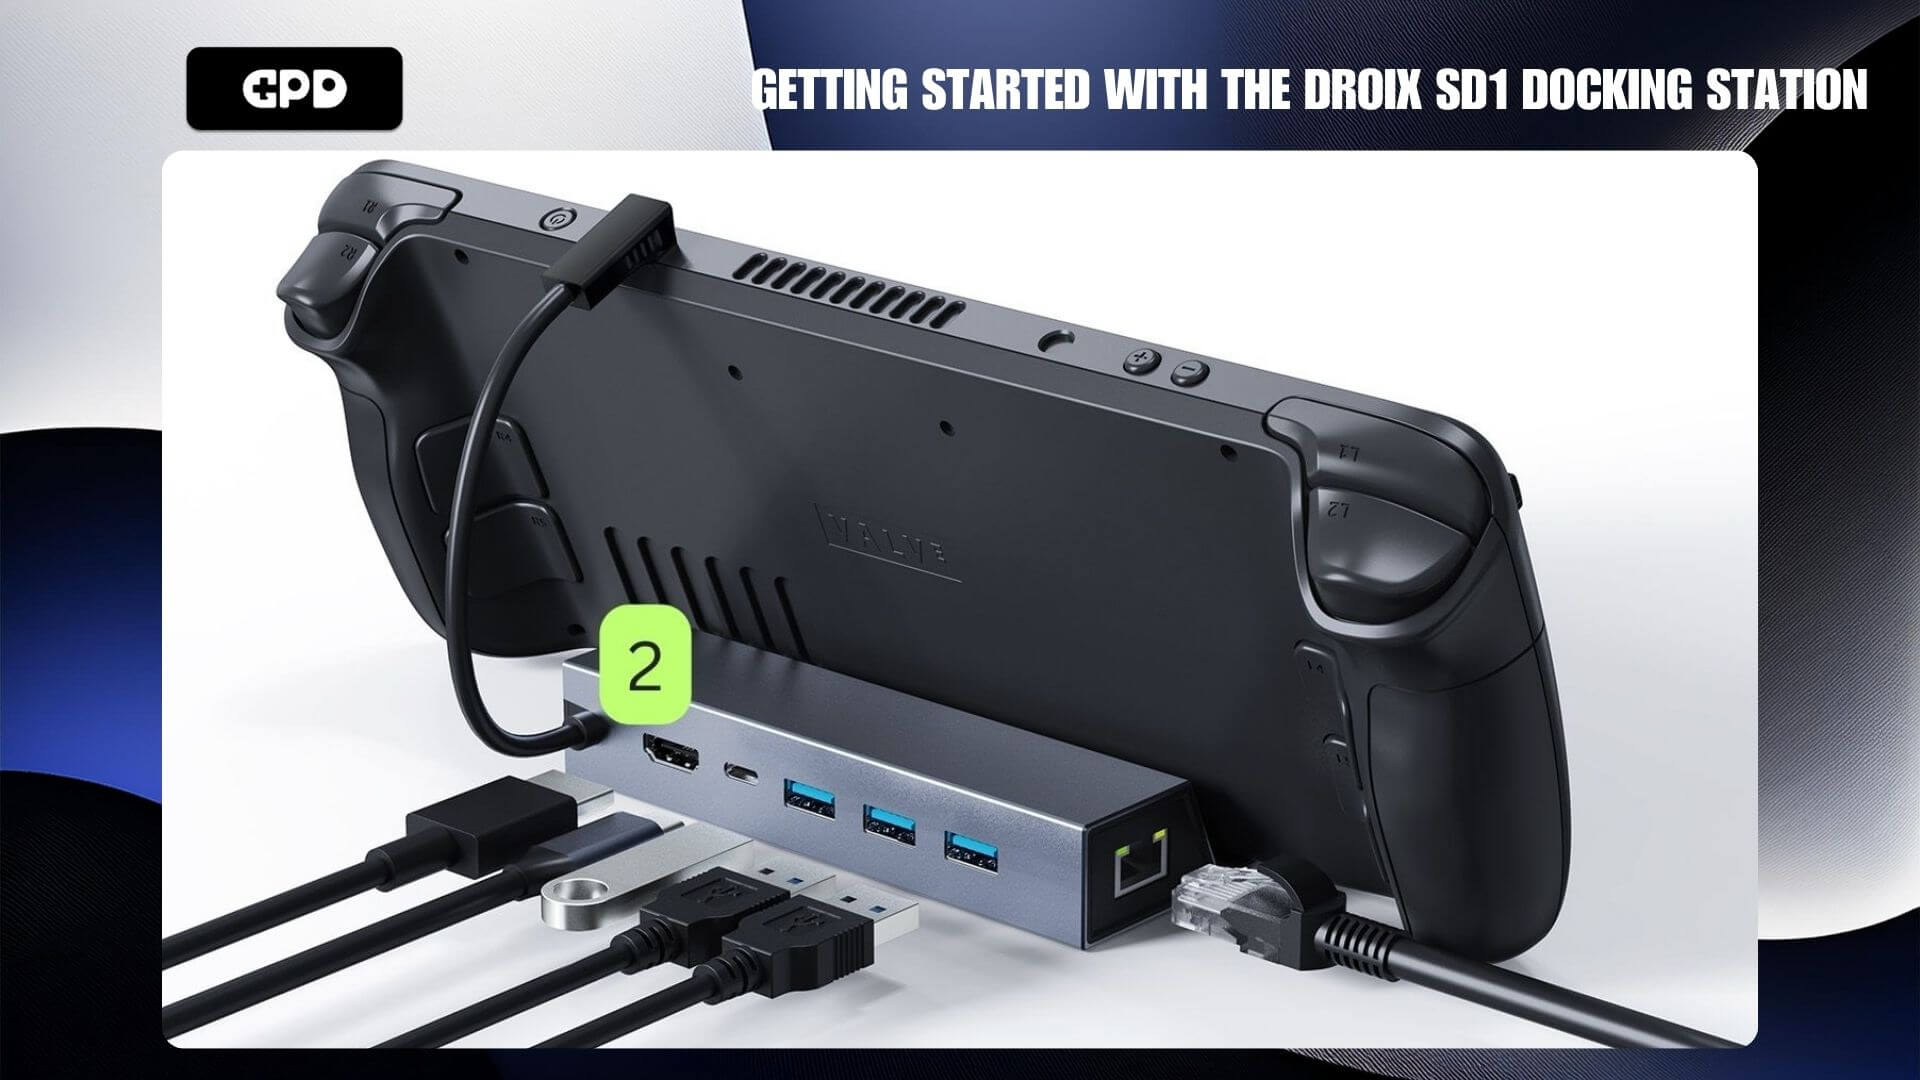
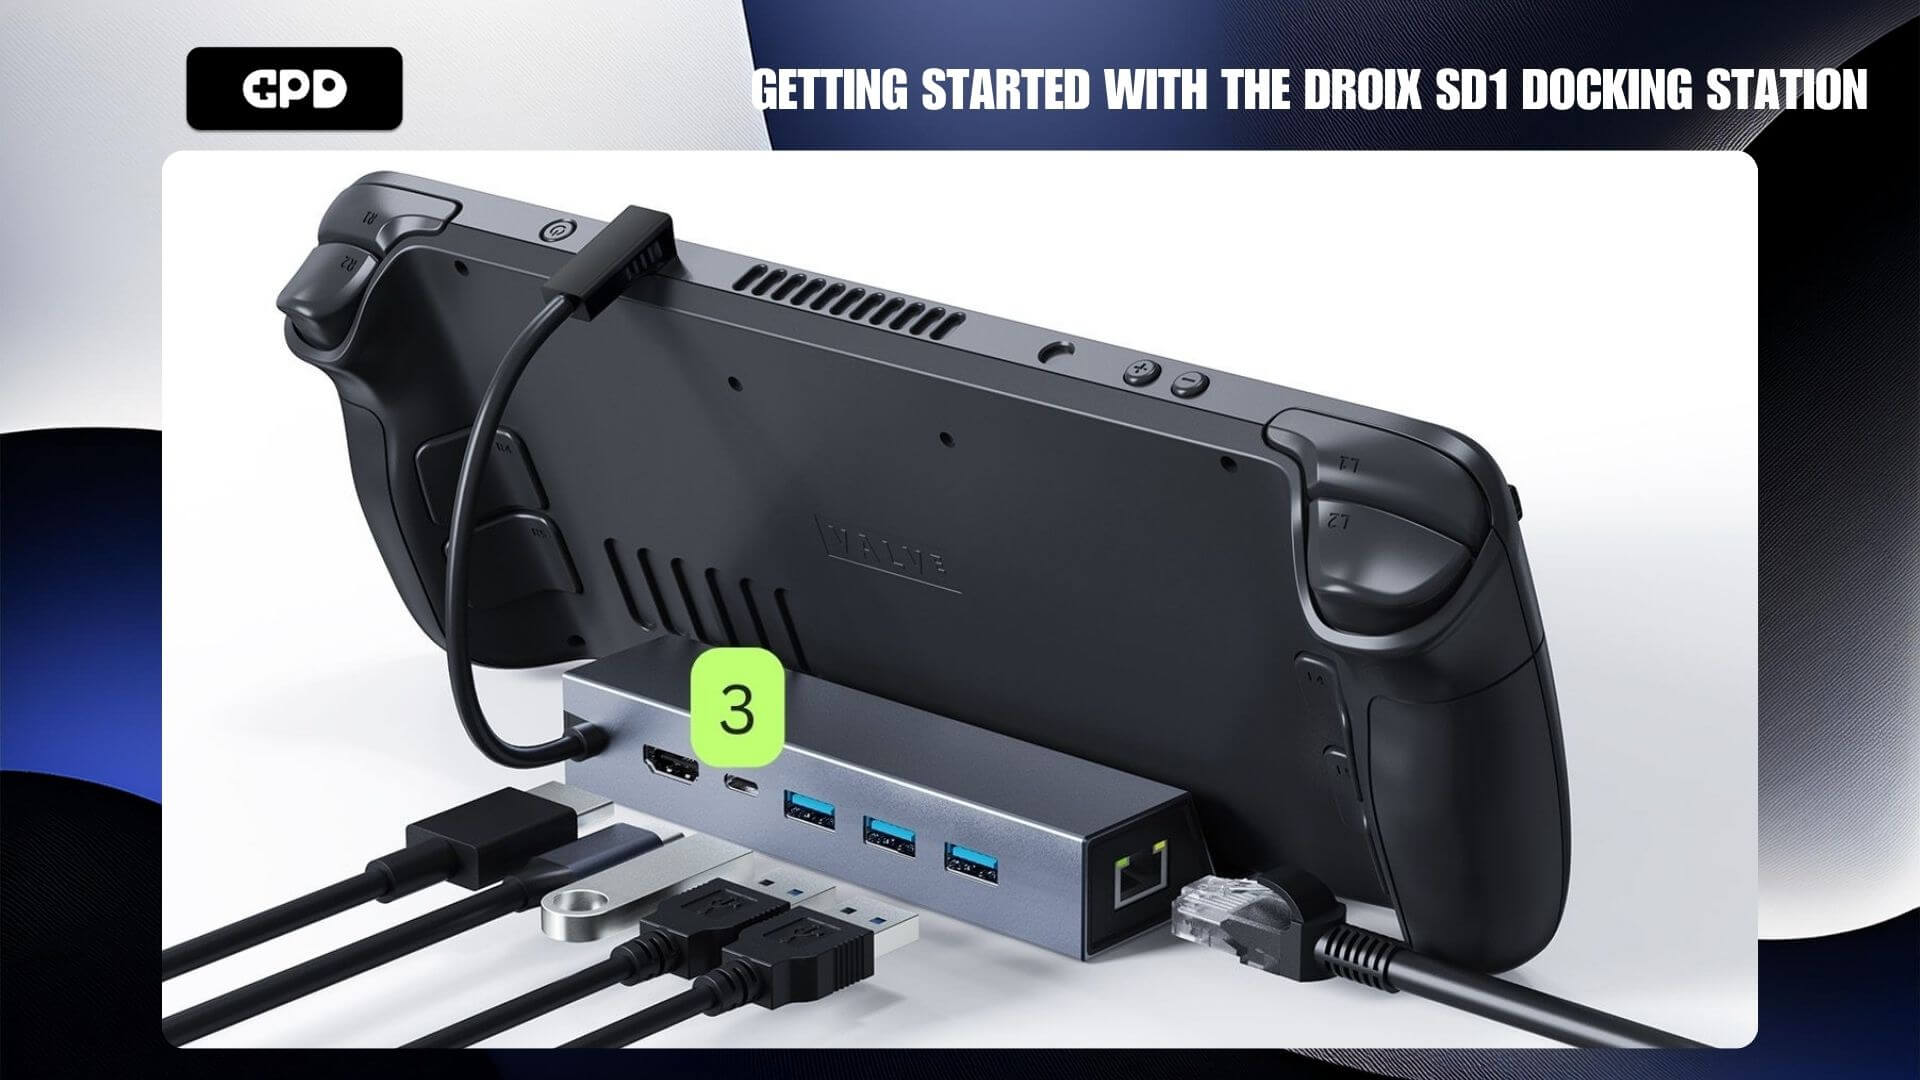
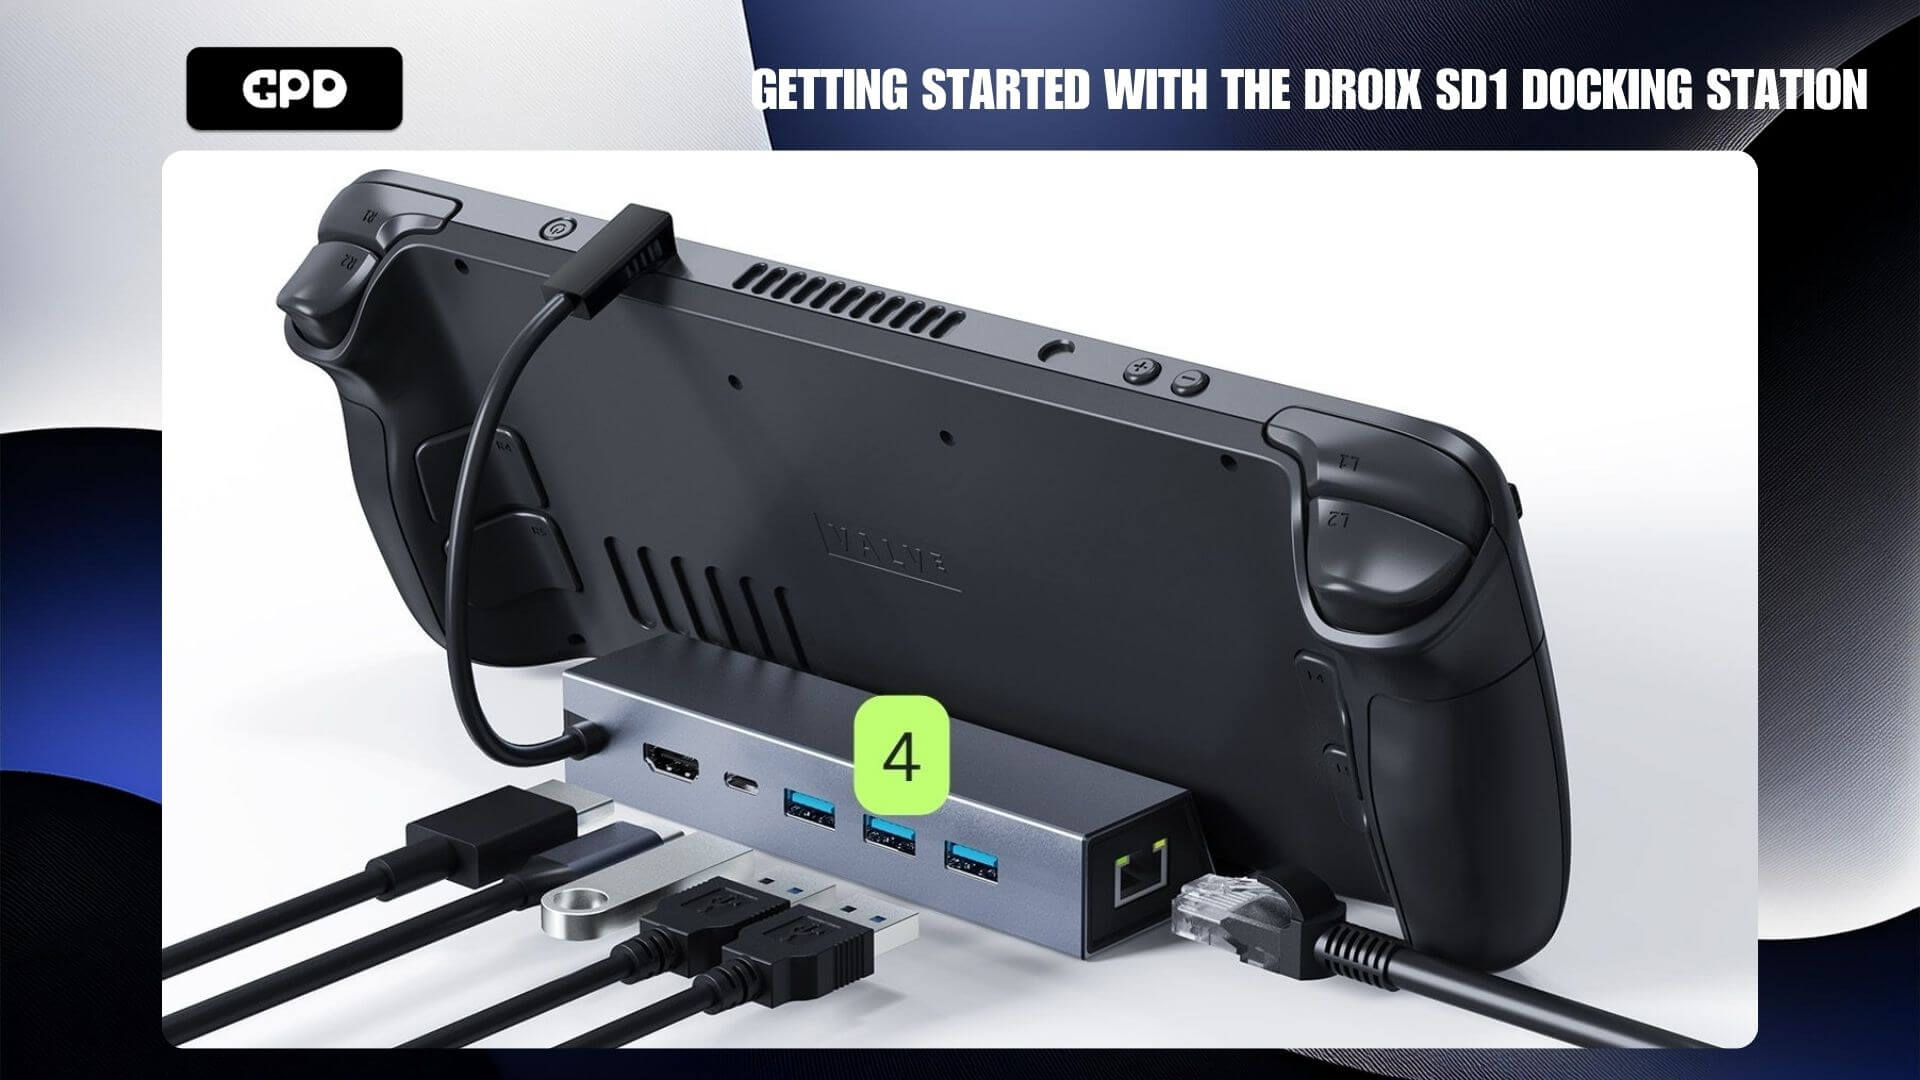
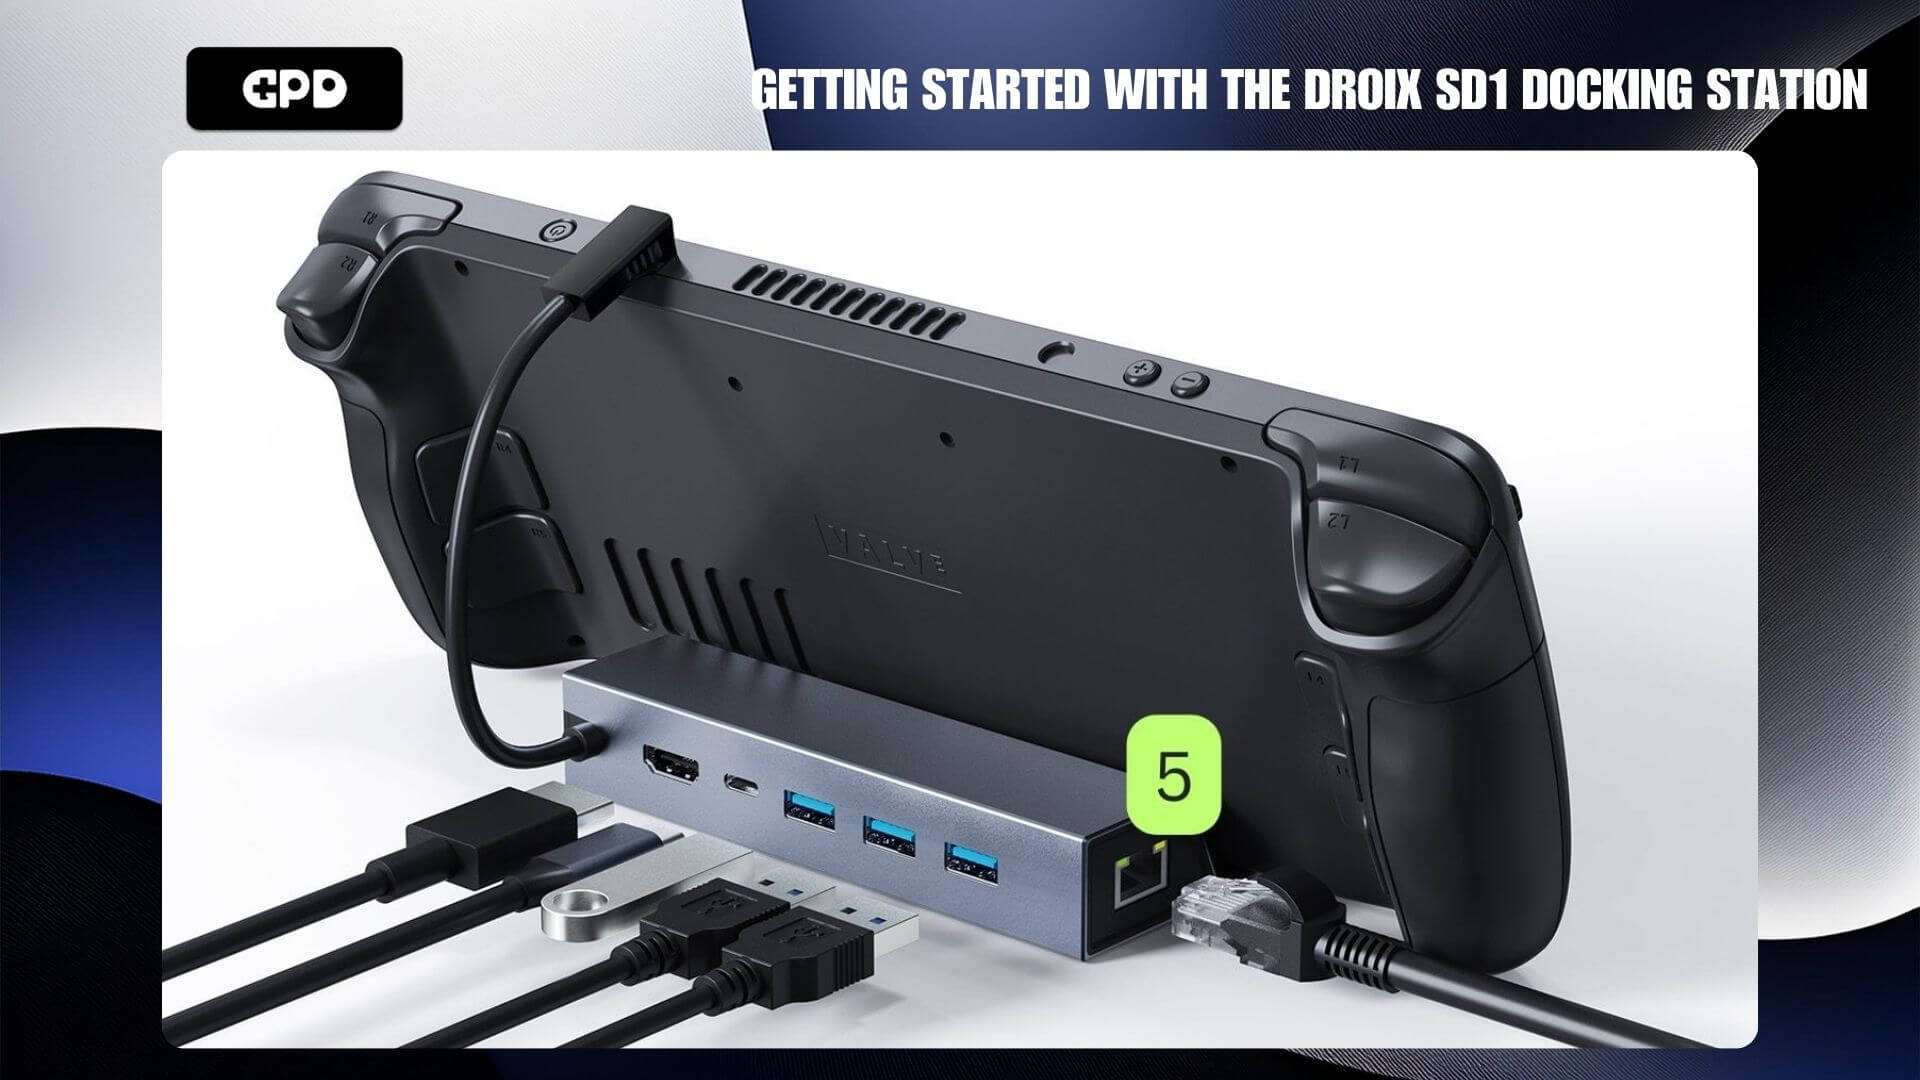
Ensure that your DroiX SD1 docking station is placed on a flat, stable surface. Any uneven surfaces or accidental bumps could potentially affect or damage both the dock and the handheld device connected to it. As you follow the steps in this guide, refer to the image below for the location of each port/connection on the SD1 Docking Station.
Dock Your Handheld Device #
Start by connecting your handheld gaming device using the attached USB Type-C cable on the SD1 (see image below). Place your device into the dock for a seamless connection.
Connect Your Display #
To enhance your gaming experience on a larger screen, connect an HDMI cable between your SD1 Dock and your display (refer to the image below). This could be a TV, monitor, projector, or another screen! Be sure to switch the display input to the correct HDMI source if necessary. The SD1 supports up to 4K resolution at a 60Hz refresh rate, offering an immersive experience for games or media in the best quality. Please note, the HDMI cable is not included in the package.
Power & Charge Your Device #
Next, ensure your device stays powered and charged during your gaming sessions. Connect a charger to the USB-C PD port at the back of the SD1 Docking Station (see image below). The SD1 supports up to 100W charging, so your device won’t run out of power mid-game. This rapid charging feature is also great for giving your handheld a quick boost before taking it on the go. Note that the charger is not included with the dock, but you can use the charger that came with your handheld device or invest in a 100W charger for faster charging.
Once you’ve completed this setup, you’re ready to enjoy your favorite games on the big screen without delay. But there’s more to explore to get the most out of your SD1 Dock!
USB-A 3.0 Ports #
The DroiX SD1 Docking Station comes with three USB-A 3.0 ports located at the back of the device (see image below). These ports allow you to connect a wide range of peripherals like controllers, headsets, keyboards, mice, and other USB devices. This enhances your gaming experience and transforms your Windows handheld into a versatile tool, allowing you to browse the internet, watch videos, shop, and engage in general PC activities beyond gaming.
Ultra-fast Internet Connection #
For a direct, ultra-fast, and stable internet connection, connect an ethernet cable to the dock. This reduces latency and improves performance during online gaming or streaming. The ethernet port is located on the side of the SD1 Dock (see image below). Please note, the ethernet cable is not included.
Device Settings #
Windows Display Settings #
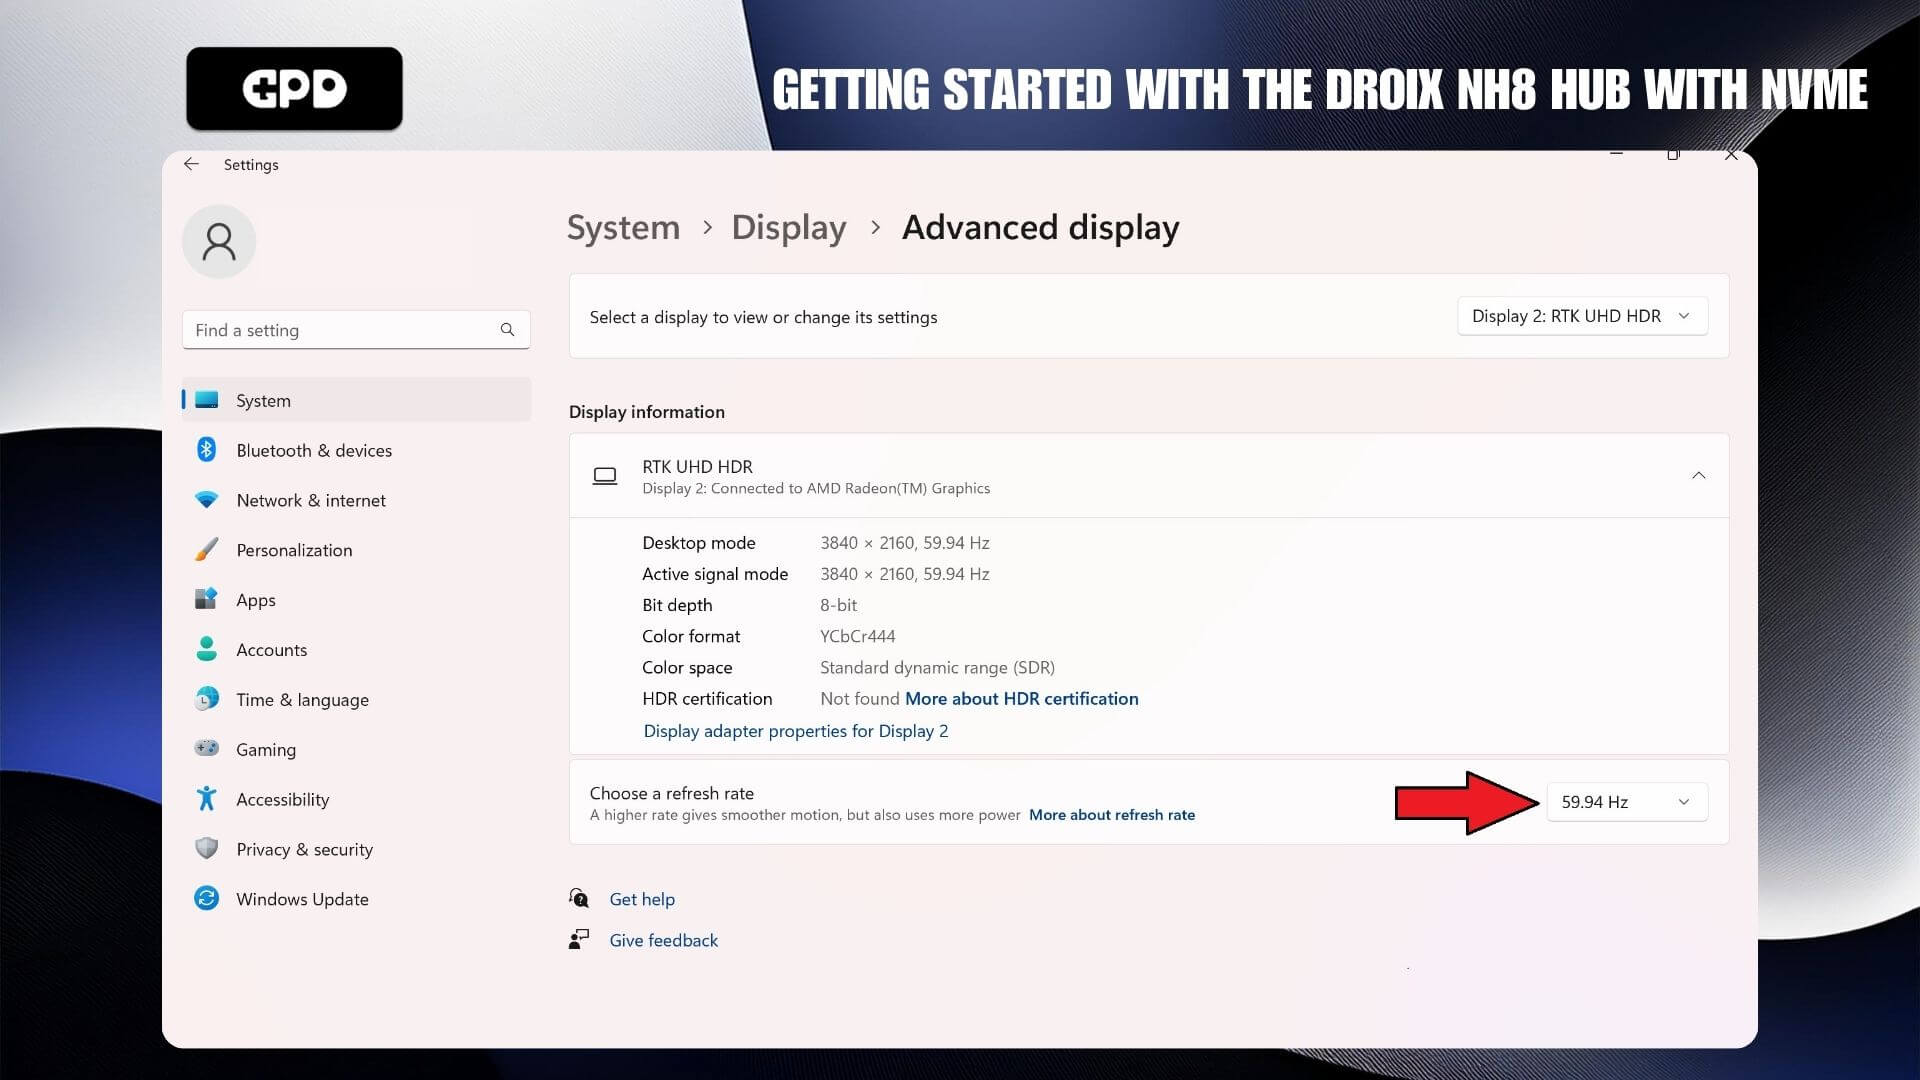
The DroiX SD1 docking station truly elevates visual quality and smoothness, supporting up to 4K resolution and a 60Hz refresh rate via its HDMI port. This ensures your games look incredible and run smoothly. If both your device and display support higher resolutions, we highly recommend setting them to the maximum available resolution and refresh rate. Doing so will significantly enhance your gaming experience, allowing your games’ graphics to shine and ensuring smoother gameplay.
Keep in mind that increasing the resolution and refresh rate may lead to higher battery consumption. This is important to consider when using your device in handheld mode. To balance performance and battery life, you may want to adjust these settings based on your current needs.
To adjust your display settings in Windows 11:
- Type ‘Display Settings’ in the Windows search bar and open it.
- Change the Display Resolution to the highest available option.
- Select Keep Changes.
- Select the Advanced Display option.
- Change the Refresh Rate to the highest available option.
- Select Keep Changes.

Handheld Compatibility #
The DroiX SD1 docking station supports a wide range of handheld devices, but it’s important to know which ones are compatible. Below is a list of supported devices as well as some that we’ve tested. We’ve also included notes for certain devices to help if you’re experiencing any difficulties.
Supported Devices: #
- Steam Deck
- ROG ALLY
- GPD WIN 4 – Requires the front screen to be lifted.
- GPD WIN 4 (2023) – Requires the front screen to be lifted.
- ONEXPLAYER 2
- AOKZOE A1 Pro – Must be positioned vertically.
Not Supported: #
- AYN Loki: Not supported – no top port.
- AYN Loki MAX: Not supported – no top port.

SD1 Docking Station #
- SD1 Docking Station
- Gigabit Ethernet
- 100W PD USB-C
- HDMI Output
- Compatible with GPD WIN 4 2023 & Many More
PAYMENT INFO
WARRANTY
SHIPPING AND TAXES
WHAT’S INCLUDED